Link to the discussion thread for the new Ad Manager: http://xenforo.com/community/threads/xenfx-ad-manager.17343/#post-226872
This is the first release of XenAMS Alpha. Back-up your Database before installing. No guaranties or warranties given, so use at your own risk.
If you already have a copy installed, you will need to uninstall it to install this version. Future releases will not need to be uninstalled.
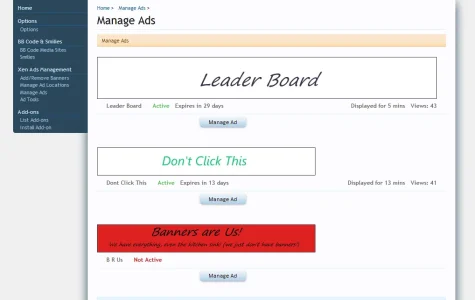
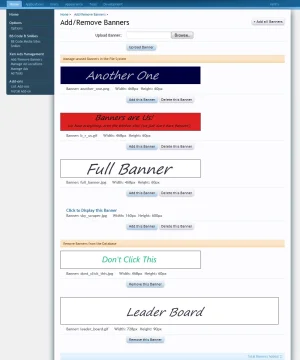
Xen Ads Management System will give Admins control over how and where a sponsor's ad(s) will display.
Main Features
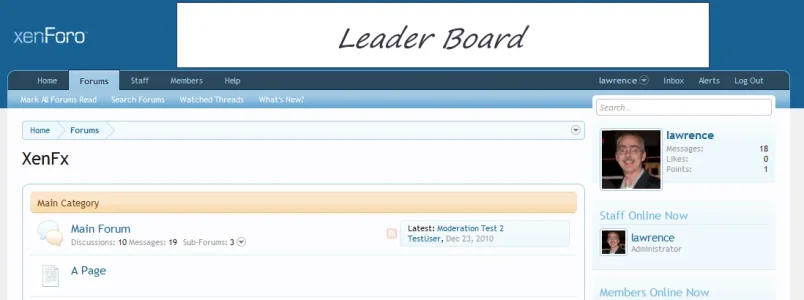
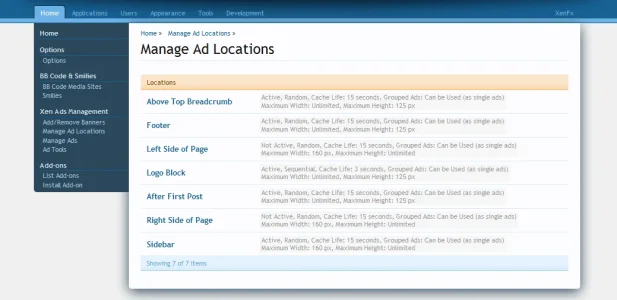
- includes up to 7 ad locations: logo block, above top of breadcrumb, sidebar, footer, after 1st post, and left and right of the page
- supports all standard banner sizes
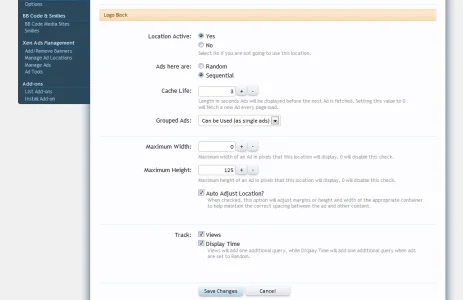
- each ad location can be set to random or sequential
- each ad location can be set to track displayed time and views
- time to keep an ad displayed, before a new one is fetched, can be set for each location
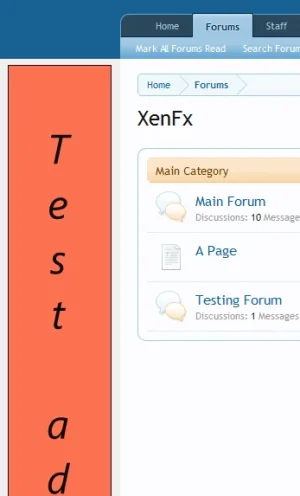
- Logo block, Left & Right Page locations have an auto adjust feature (see the AutoAdjust Screen Shots below this list)
- the Super Admin can give or deny the permission to access XenAMS in the Admin Panel
- maximum Width and Height of banners for each location can be set
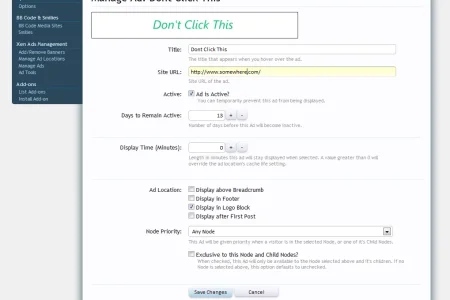
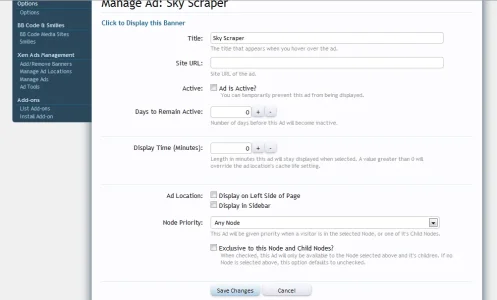
- each ad can over-ride a locations time setting to be displayed for X minutes
- expiry time for each ad can be set from 1 day to 365 days
- each ad can appear in multiple ad locations
- each ad can be made exclusive to a specific Node and Child Nodes
- completely phrased

Limitations
- as XenAMS is created for sponsor's ads, ads are shown for all group members. It does not support Google Ads, though a future version may allow for this depending on Google's TOS
- grouping of ads are not supported in this version
- Ad Tools is not implemented in this version
- Flash ads are not supported, but may be if enough members request it
- although 7 locations are included, it is not recommended to use all 7 locations at the same time.
- unless your style is specifically designed to use both Tower locations (Left and Right side), it is recommended to use only 1.
Queries
XenAMS will add a minimum of 2 queries, and a maximum of X queries. X is depended on how you set each location and how many locations you have set to active.
Installation Process
- adds 5 tables to your XenForo Database
- inserts a new data_key in the data_registry
- creates a new folder in the data directory
- adds 90 new phrases, and 14 new templates
Uninstallation Process
- removes all data during the Installation process, with the exception of the xenams folder created in the data directory
Installation (in this order)
- download the zip file to your PC, and extract.
- upload the contents of the library folder to: yourxenforo/library/
- log in to your Admin Control Panel
- Admin -> Add-ons -> Install Addon. Click the Install from upload file button, and browse to the location you unzipped this Addon in, and click the addon_xenAms xml file. Once you selected the file, click the Install Add-on button.
Template Edits
As of this version, template edits are required. You only need to complete the edits for the locations you will only be using. I recommend completing the edits for each location.
As of XenForo Beta 5, Xen AMS will require a minor edit of up to four XenForo templates for each style your members can select: logo_block, message, PAGE_CONTAINER, and EXTRA.css. The Sidebar location is done through a Hook, but the CSS container ID is found in EXTRA.css. These template edits apply to the default style, if you are using a custom style, there may be differences.
AdminCP -> Appearance -> Templates -> logo_block
Find <span class="helper"></span>
Directly underneath add:
Press Save and Exit button.
AdminCP -> Appearance -> Templates -> message
Scroll to the very bottom, and after </li>, add:
Press Save and Exit button.
AdminCP -> Appearance -> Templates -> PAGE_CONTAINER
Find <!-- top breadcrumb, top ctrl -->
and directly below, add:
Find <div class="breadBoxBottom"><xen:include template="breadcrumb" /></div>
Directly below, add:
Find these 2 lines:
<div id="content" class="{$contentTemplate}">
<div class="pageWidth">
And insert this between them:
Note: if your style is already designed for tower ads, remove the id="leftside" and id="rightside" divs, place the appropriate <xen:include template="xenams_xxxxx" /> in your styles tower ad location. Also leave auto adjust setting for left and right towers off.
AdminCP -> Appearance -> Templates -> EXTRA.css
Paste in:
Press Save and Exit button.
Each included templated listed above has an associated CSS file, consisting of a location specific container ID. You can fine tune the position of a sponsors banner to suit your style, or add in additional CSS that will be applied to that location's div.
TIP
Not planning to use the Logo block for banners? Upload your sites logo(s) to the xenams directory. Then use it to rotate your sites logo, or logo block image. Set it to load a new image every X hours. As an URL is required, set the URL to your site, and if desired remove the a href from the image in the xenams_logo template.
This is the first release of XenAMS Alpha. Back-up your Database before installing. No guaranties or warranties given, so use at your own risk.
If you already have a copy installed, you will need to uninstall it to install this version. Future releases will not need to be uninstalled.
Xen Ads Management System will give Admins control over how and where a sponsor's ad(s) will display.
Main Features
- includes up to 7 ad locations: logo block, above top of breadcrumb, sidebar, footer, after 1st post, and left and right of the page
- supports all standard banner sizes
- each ad location can be set to random or sequential
- each ad location can be set to track displayed time and views
- time to keep an ad displayed, before a new one is fetched, can be set for each location
- Logo block, Left & Right Page locations have an auto adjust feature (see the AutoAdjust Screen Shots below this list)
- the Super Admin can give or deny the permission to access XenAMS in the Admin Panel
- maximum Width and Height of banners for each location can be set
- each ad can over-ride a locations time setting to be displayed for X minutes
- expiry time for each ad can be set from 1 day to 365 days
- each ad can appear in multiple ad locations
- each ad can be made exclusive to a specific Node and Child Nodes
- completely phrased


Limitations
- as XenAMS is created for sponsor's ads, ads are shown for all group members. It does not support Google Ads, though a future version may allow for this depending on Google's TOS
- grouping of ads are not supported in this version
- Ad Tools is not implemented in this version
- Flash ads are not supported, but may be if enough members request it
- although 7 locations are included, it is not recommended to use all 7 locations at the same time.
- unless your style is specifically designed to use both Tower locations (Left and Right side), it is recommended to use only 1.
Queries
XenAMS will add a minimum of 2 queries, and a maximum of X queries. X is depended on how you set each location and how many locations you have set to active.
Installation Process
- adds 5 tables to your XenForo Database
- inserts a new data_key in the data_registry
- creates a new folder in the data directory
- adds 90 new phrases, and 14 new templates
Uninstallation Process
- removes all data during the Installation process, with the exception of the xenams folder created in the data directory
Installation (in this order)
- download the zip file to your PC, and extract.
- upload the contents of the library folder to: yourxenforo/library/
- log in to your Admin Control Panel
- Admin -> Add-ons -> Install Addon. Click the Install from upload file button, and browse to the location you unzipped this Addon in, and click the addon_xenAms xml file. Once you selected the file, click the Install Add-on button.
Template Edits
As of this version, template edits are required. You only need to complete the edits for the locations you will only be using. I recommend completing the edits for each location.
As of XenForo Beta 5, Xen AMS will require a minor edit of up to four XenForo templates for each style your members can select: logo_block, message, PAGE_CONTAINER, and EXTRA.css. The Sidebar location is done through a Hook, but the CSS container ID is found in EXTRA.css. These template edits apply to the default style, if you are using a custom style, there may be differences.
AdminCP -> Appearance -> Templates -> logo_block
Find <span class="helper"></span>
Directly underneath add:
Code:
            <xen:if is="{$adData.logo}">

                <xen:include template="xenams_logo" />

</xen:if>AdminCP -> Appearance -> Templates -> message
Scroll to the very bottom, and after </li>, add:
Code:
<xen:if is="!{$post.position} AND {$adData.post}">

    <xen:if is="!{$message.conversation_id}">

        <xen:include template="xenams_post" />

    </xen:if>

</xen:if>AdminCP -> Appearance -> Templates -> PAGE_CONTAINER
Find <!-- top breadcrumb, top ctrl -->
and directly below, add:
Code:
                            <xen:if is="{$adData.breadcrumb}">

                                <xen:include template="xenams_breadcrumb" />

                            </xen:if>
Find <div class="breadBoxBottom"><xen:include template="breadcrumb" /></div>
Directly below, add:
Code:
    <xen:if is="{$adData.footer}">

        <xen:include template="xenams_footer" />

    </xen:if>
Find these 2 lines:
<div id="content" class="{$contentTemplate}">
<div class="pageWidth">
And insert this between them:
Code:
    <xen:if is="{$adData.leftside}">
    <div id="leftside">
        <xen:include template="xenams_leftside" />
    </div>
    </xen:if>

    <xen:if is="{$adData.rightside}">
    <div id="rightside">
        <xen:include template="xenams_rightside" />
    </div>
    </xen:if>
Note: if your style is already designed for tower ads, remove the id="leftside" and id="rightside" divs, place the appropriate <xen:include template="xenams_xxxxx" /> in your styles tower ad location. Also leave auto adjust setting for left and right towers off.
AdminCP -> Appearance -> Templates -> EXTRA.css
Paste in:
Code:
.xenams_sidebar {
    padding-top: 4px;
    padding-bottom: 1px;
    text-align: center;
}

.xenams_sidebar img {
    padding: 0px;
}

#content {
    position: relative;
}

#leftside {
    left: 10px;
    width: 120px;
    height: 500px;
    background: @primaryDarker;
    position: absolute;
    top: 10px;
}

#rightside {
    right: 10px;
    width: 120px;
    height: 500px;
    background: @primaryDarker;
    position: absolute;
    top: 10px;
}Each included templated listed above has an associated CSS file, consisting of a location specific container ID. You can fine tune the position of a sponsors banner to suit your style, or add in additional CSS that will be applied to that location's div.
TIP
Not planning to use the Logo block for banners? Upload your sites logo(s) to the xenams directory. Then use it to rotate your sites logo, or logo block image. Set it to load a new image every X hours. As an URL is required, set the URL to your site, and if desired remove the a href from the image in the xenams_logo template.


