TinyMCE Quattro and its wysiwyg bbcodes

TinyMCE Quattro and its wysiwyg bbcodes 2.7.2

No permission to download

cclaerhout

Well-known member
How to customize the buttons icons?

I) A few things to know

To customize buttons of this editor, you will have to use the BbCodes & Buttons Manager 2.x (BBM). One of the major change between TinyMCE 3.x (mce 3) and TinyMCE 4.x (mce 4), or let's say the one that interests us to customize the editor buttons, are the buttons icons. They are no more using the gif/png formats but are using instead some vectorial icons embedded through a font. This means images are now scalable and will display perfectly with high resolution screens. This also means you will have to adapt to those new fonts: they lost their colors. Fortunately, it just takes a little time to get used to.

These font icons have also another huge advantage: it makes the buttons customization very easy. One of the major flaw of the previous Buttons manager was us, "us" meaning people who are not designers or people who don't want to spend 2 hours to create/find a 16x16 pixels icons then integrate it inside a sprite. With a font icon, some designers have already done the job for you, all you need to do is to use a four characters unicode to select your icon among a font.

Mce 4 is using the icons made by IcoMoon. After a quick check on Internet, it easy to see that it is currently the font icons reference, not only for its icons packs, but especially for its application. As a web user, I don't like to make any adds on Internet. I will this time put this principle aside with recommending you to support this website with buying its icon pack. The 1200 vectorial icons are really good and the license is for developers extremely convenient. Those you can't afford to buy this pack don't have to worry, there are others thousands of free icons with a Creative Common Licence.

For those, you just want to use provided icons with the BBM, you don't need to read the second paragraph. Just have a look at the below sreenshot and go to the third paragraph.

II) The IcoMoon application

IcoMoon has a standing application that lets you create and/or manage your icons font in a few clicks. You can do this online or offline (with a Chrome application). The TinyMCE Quattro addon has two fonts:
  • The official font of TinyMCE
  • A font called XenForo with custom icons
If you modify one of these fonts (avoid to play with the official one), try to save it somewhere because it will be replaced after updating this addon.

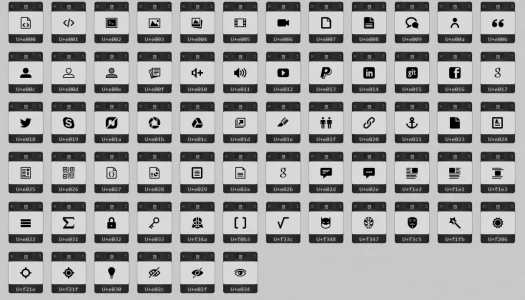
I'm not going to explain how to create a new font, but how to get the icons unicode and how to update a font (with adding/deleting icons). For a basic use, you only need to know the icons unicode inside the font. Here is a map:

TinyMCE Font Map
tinymce_font_map.webp
XenForo Font Map
xenforo_font_map.webp
For those who want to know how to access this map, it's really easy:
  1. Use the IcoMoon application and import the svg icons.
    • The two icons fonts are in this directory: {yourForum}/styles/sedo/tinyquattro/fonts
      • The Mce 4 icons font name is "icomoon"
      • The XenForo icons font name is... "xenforo"
    • You can see that the two above fonts have two sub sets of icons (normal & small). This will be seen later if you want to add some icons.
    • The import format is svg. It is recommended to import the {yourFont}.dev.svg font.
      I didn't include this development pack for the official font, since it should be avoided to be modified, but you can still import the svg file.
  2. Once imported, just click on the bottom button "FONT =>", you will get to a new page the one that gave the above screenshot.
For those who want to add new icons inside the font, it's also really easy:
  1. Import your svg icon
  2. Select new icons (you just need to click on them | you can download new packs of icons)
  3. Go the font creation page
  4. Click on "font metrics" and check the default size.
    • The normal font size is 16px (at least for most of the svg icons). Mce 4 has an option that allows to use small icons with the editor (see the TinyMCE quattro addon options). I'm not sure of this, but I think the default size icons is then 14px.
    • So to sum up, if you want to add some icon, you will have to do it for the two sub sets fonts: normal & small. It's actually not hard, you just have to save twice the font with a different size: 16px vs 14px.
  5. Click on "preferences", give a name to the font (xenforo or xenforo-small), this will avoid you to modify it after. Don't care other fields.
  6. Download
  7. You've got your font with your new icons.
    • Extract it
    • Replace the files in the addon font directory
    • Backup your font for the next addon update.
      If many people ask me for the same icon, I will include it in the font, otherwise I don't want to update this font to avoid to have an addon icon with the same unicode than your custom icon, that will force you to update your custom pack. It's annoying, I don't want to do that.
This is a lot of text, but in fact a very few clicks.


III) Customize your buttons with the BBM

Let's take the example of the spoiler bbcode. Here's its configuration inside the button manager:

spoilerConfig.webp
I don't think I really need to explain it. We've got our XenForo icon set and the unicode of the icon is set. If you want to change the icon, change this unicode. If you want to create a text button, change the button type and type the button text in the second field.

That's all.
 
Last edited:
How to customize the buttons return? (1/2)

What I call "buttons return" in a certainly bad English is what does the button do after having been clicked.

I) The "direct return"
Most of you already know the concept, but let's explain it again for new comers. Let's take again the example of the spoiler BbCode.

spoilerConfig2.webp
Ignore the "Button description" (I should have not put the field here) and the "Button return option" (not use with the direct return).

When you choose "Direct" as button return, this will insert in the editor the tag of the BbCode. Example:
Code:
[spoiler][/spoiler]

If you want to add an option to the spoiler tag, then just fill the "Tag options" field (ie: "Title"). This will give:
Code:
[spoiler=Title][/spoiler]

And if you want to give a content to the BbCode, just do the same thing with the the "Tag content" field (ie: "This is my content"). This will give:
Code:
[spoiler=Title]This is my content[/spoiler]

Nothing to say more, this return is fast and easy.

II) The "Template return" - presentation
Disclaimer: to use the template return, you will need to be able to use the XenForo templates and you will need some basic knowledge in Javascript.

A "template return" is when an overlay loads after you click on a button. To keep it simple the global window is using the Mce 4 modal system and the content of the window is using the XenForo templates system. It's an hybrid.

To set a "template return", you just need to select "Template" in the "Button return" field and to type the suffix dialog in the "Button return option" field.

What is a suffix dialog?
If you to be able to call a template after having clicked on a button, this template must begin by "quattro_dialog_bbm_", comes after the suffix of your dialog. The BBM addon includes a template demo called "quattro_dialog_bbm_demo". So the suffix dialog that must be typed in the "Button return option" field is simply "demo".

Why this suffix dialog?
Because you don't want someone to use Javascript to use any of your templates. I didn't create this system, this is the XenForo developers. It is available thanks to the XenForo ajax functions.
When you want to create your template, I strongly advice you to take a look of the existing dialogs. I've done different css to help you to create the overlay layout. They are included in this css template: "quattro_dialog.css". That's why it is must be included in your dialog template. There are also some classes that are used by the Javascript framework and some special variables available in those dialog. I'm going to try to list them after.

Your template must have a required Javascript to manage the return, which means after you click on the submit button of your modal window. The content of this Javascript will be basic, so most of people should be able to create one. Once again, if you look at the "quattro_dialog_bbm_demo" template, you will see that a demo Javascript has also been included. Its path is: {yourForum}/js/sedo/tinyquattro/templates/bbm_demo.js

III) The "Template return" - template variables & classes

Available variables list:
  • $selection.text => selection in raw/text format (before the user click on the button) | string
  • $selection.html => selection in html format | string
  • $selection.bbCode => selection in BbCode format | string
  • $isUrl => if the selection is an Url (link or email) | true/false
  • $isLink => if the selection is a link | true/false
  • $isEmail => if the selection is an Email | true/false
  • $urlDatas.text => the url text | string
  • $urlDatas.href => the url link | string
  • $attachments => (only in XenForo 1.2 posts/thread) - the attachments uploaded in the post/thread | array
  • $imgAttachments => (only in XenForo 1.2 posts/thread) - the image attachments uploaded in the post/thread | array
Css classes with a Javascript use:
  • mceTitle => it will give a title to the modal window (needed)
    Example:
    HTML:
    <div class="mceTitle">My Modal Title</div>

    The element with this class can also have two other optionals parameters that let you control the modal width & height.
    Example:
    HTML:
    <div class="mceTitle" data-width="450" data-height="370">My Modal Title</div>

  • mceFocus => it will focus the field
  • mceSubmit => it will change the title of the submit button
  • mceCancel => it will change the title of the cancel button
  • mceTabs & mcePanes => it will create some tabs thanks to jQueryTools
    Reference template: quattro_dialog_email

    I'm not going to explain how to use those two classes, just check the the email dialog, its logic, the mceTabs children elements will be used to create the tabs and the mcePanes children elements will be used to create the panes. Tabs & Panes are of course linked together.

    If you want to open another tab/pane than the first one, just add the class "mceActive" to the tab element you want to open.

  • mceSlides & mceSlidesTabs => it will create a slider thanks to jQueryTools
    Reference template: quattro_dialog_smilies_slider

    Important: you must load this external Javascript inside your template to enable the slider:
    HTML:
    <xen:require js="js/sedo/tinyquattro/extra/jqt_slider.js" />

    The logic is similar the for the tabs & panes. You've got your slides element with the class mceSlides and all its children will be the slides. After your slides element, you've got the tabs element with the class mceSlidesTabs. This element allows to browser between slides. It is linked to the slides element.

  • Nice checkbox: if you want to display nicer checkbox, you can use this shortcut:
    HTML:
    <div    class="xenCheckBox"
       data-phrase="My checkbox description"
       data-inputname="myInputName">
    </div>
    This checkbox will in fact use a input field. If you want this checkbox to be checked by default add this data: data-checked="checked"
Real css with a layout use:

You will find all you need in the "quattro_dialog.css" css template. The most useful css are the "mce-xen-content" and all structure base one the dl/dt/dd tags. The dl tag can have if wanted the class "xenmce_inline" to align inline th dt & dd tags.


The bridge between the overlay and the Javascript file:
  • Every input tags (input, textarea, select) will be automatically send to the submit function (check the event "data"). Don't forget to specify a name attribute to get the data.
  • If you need another field or tag content to be send, just add it this data parameter: data-input (data-input="whatYouWant").
    Both the content of the data-input parameter and the content of its tag will be send to the submit function
 
Last edited:
How to customize the buttons return? (2/2)

IV) The "Template return" - Javascript required file
Here is the content of the demo example (without the console.log function):
Code:
xenMCE.Templates.Bbm_demo = {
  onafterload: function($overlay, data, editor, parentClass)
  {

  },
  submit: function(event, $overlay, editor, parentClass)
  {
    var tag = parentClass.bbm_tag, data = event.data, content = data.content, options = data.options;

    parentClass.insertBbCode(tag, options, content);
  }
}

Important
Just one rule here: your Javascript code must be inserted inside this object "xenMCE.Templates.Bbm_{yourDialogName}"

There are two functions:
  1. The first one will loaded after the overlay is displayed, which explain its name "onafterload". You will probably don't have to use it. It just allows to modify or implement interative function. The arguments are quite simple:
    • $overlay => is the jQuery overlay element. Ie: $overlay.find('.myClass');
    • data => is not useful in this situation: it should contain the variables to pass to the fields, but there won't be.
    • editor => the current active editor. Use this if you want to use any function of the TinyMCE API.
    • parentClass => the framework functions (the most useful will be give later)
  2. The second one is the most important. It is used to submit data to the editor. Let's see the arguments:
    • event => is the official TinyMCE event object. The most useful is the event.data which contains all the final inputs value of your overlay
    • $overlay => already explained
    • editor => already explained
    • parentClass => already explained
The "parentClass" main functions
The parentClass source is in this file: {yourForum}/js/sedo/tinyquattro/tinymce/plugins/xenforo/plugin.src.js ; look for "Extend xenMCE - Tools: TinyMCE plugin" inside the content.

Before to give the list of functions, let give one variable only available in this context: "parentClass.bbm_tag". It returns the tag of your BbCode.

And now the main functions:
  • insertBbCode(tag, options, content)
    The last two arguments are optional. Use this function to insert a Bb Code inside the editor. You will probably only need to use this function.
  • cleanWhiteSpace($jQueryElement)
    This function can be useful with the onafterload callback. It will trim all white space between tags (useful if you use span).

  • unescapeHtml(string, options)
    Normally, this function can be useful if you want to get data from the Rich Text Editor and send them inside a textarea or input of the overlay. Now, since the template has some variables to get the selection, I don't think you will use it.
    Available options: 'noBlank' (it will unescape the html without the blanks)

  • escapeHtml(string, options)
    Use this function to get data from textarea/inputs (from the overlay) and send them inside the Rich Text Editor
    Available options: 'noBlank' & 'onlyBlank'

  • zen2han(string)
    Use this function to convert asian full width characters (Chinese & Japanese IME) to half width (latin alphabet). Example: QWERTY=> qwerty
 
Last edited:
FAQ

  1. I've installed the addon but I can still see the default editor, what can I do?
    Check the TinyQuattro Permissions.
    mce16-png.48314
  2. I've installed the addon but I have no more editor at all !
    Check if you have installed on your board this "message-auto-save-drafts" addon. You must not load this javascript: it's using mce 3 functions that are no more compatible with mce 4. Further more, mce 4 has already a draft autosave function.

  3. The justify & background color buttons are working inside the editor but when I save my message, it doesn't work...
    This is a normal behaviour. These functions are not implemented in the XenForo html=>bbcode converter and this converter can't be extended (yet ?). Just use the BbCodes and Buttons Manager (BBM) to take out these buttons from your configuration.

    2013/08/31 - version 1.2.0
    If you're using XenForo 1.2.x, you can now use these two buttons. Simply activated their bbcodes inside their options.
    mce-32.webp

  4. About the Table Bb Code, I can't see any option to change the background color of a row or a cell, what can I do?
    The TinyMCE editor doesn't have this feature. I don't know if it will be released one day or not. It could be coded but might be hard and especially will require to modify the official table plugin. This is not the concept of this addon which is to stick to TinyMCE last updates. There's still a solution: use the Bb Code editor and add a background option (bgcolor: #FF0000). See below:
    bcolorcell.webp
 
Last edited:
From the screenshot that looks so clean and fresh unlike the ugly looking editor we're using now. Nice work Cedric. :)

A little off-topic. When xf moves to Redactor will you be focusing on doing the same kind of development with that editor as you've done with Tinymce?
 
This is excellent! I love the fact you you can just install it normally as an add on, and away you go! :) Very very extensive. Love it.
 
Talk about late as all hail. XF 1.2 is around the corner already. We're gonna be using the new editor soon.
 
From the screenshot that looks so clean and fresh unlike the ugly looking editor we're using now. Nice work Cedric. :)
Most of the success of the new TinyMCE design comes from the IconMoon icons. I didn't know those kinds of icons fonts existed. I've discovered them two weeks before and the are simply excellent. The IconMoon online application is also quite impressive. I've bought the premium version to support them. The other design asset is the use of css gradients (it's actually easier and lighter then using image gradient background like I did on MarkItUp).

A little off-topic. When xf moves to Redactor will you be focusing on doing the same kind of development with that editor as you've done with Tinymce?
As I've already told, Redactor has drawbacks that makes it incompatible to use as an Editor (the profession, not the tool). It's indeed Wysiwyg but it's clearly not Wyciwyg (what you click is what you get) which should be a basic for any editor (the tool) and which makes the choice of Redactor a mistake in my opinion. To solve this problem, it seems there is an option to activate an external js library (rangy) in the 9 version, but then the size is close to the TinyMCE script. I would still need to try it before saying more. But since I've got now a framework that suites my needs, that is easy to update (for the TinyMCE side) and that doesn't threat my private project development, I have no reason to do it at the current time. So no, I will not spend time to develop tools with the future XenForo editor. Anyway, there is no need of a button manager since the editor has only one line of buttons. The only thing I will probably do is to update the QuoteME addon to manage the quotes insertion in the new editor, but that's all. My personnal development will focus on that addon. If the XenForo parser is really fixed and the html<=>bbcode conversion can easily be extended, this development will be public, if it's not then it will become private.
 
cclaerhout updated TinyMCE Quattro (demo) with a new update entry:

Version 1.0.2 released

Version 1.0.2 released
  • Some bugs have been fixed
  • Maps of default buttons in database (used by BBM v2)
  • Implementation of a method to create different kinds of custom Buttons with different return methods (used by BBM v2)
  • Javascript demo (kind of tutorial) to manage custom buttons using a template
  • New icons in XenForo font
  • Option to enable or disable the editor for mobile devices
  • Option to enable or disable the editor per usergroups...

Read the rest of this update entry...
 
A few things more:
  • The justify button and background color button will have to be manually taken out of the buttons configuration using the Buttons Manager version 2. At the moment they are there as a demo.
  • Don't forget to configure tinyQuattro inside the usergroups permissions to display it.
I will post some screen captures later.
 
Here are a few screen shots. I will do the documentation on icoMoon tomorrow (the fonts icons) because it's quite late now for me. For those who would like to have fun changing the icons with custom Bb Codes (using the BBM), here is a map of what I called the XenForo font:


You just need to use the last 4 characters. Example for the last icon (the eye): e034. I've written a small text a few days ago on the tinymce forum (source). I will rewrite it in the documentation tomorrow.
 

Attachments

  • mce15.webp
    mce15.webp
    5.5 KB · Views: 68
  • mce16.webp
    mce16.webp
    3.4 KB · Views: 64
  • mce17.webp
    mce17.webp
    77.3 KB · Views: 106
Last edited:
cclaerhout updated TinyMCE Quattro (demo) with a new update entry:

Version 1.0.3 released

Version 1.0.3 released
  • Add a smilies picker (can click on several smilies to insert them in the editor => doesn't close the modal on the first click). This should show you what can make the TinyMCE modal.
  • Smilies button menu width and max-height can be configured with options
  • Smilies picker modal content width and max-height can be configured with options
  • Add a smiley in the XenForo font icon for the smilies picker
  • Move an admin css template from BBM to this addon...

Read the rest of this update entry...
 
I am sure I missed an instruction somewhere because after installing I still have the old ditor? How would I go and activate it?
 
Top Bottom