• This forum has been archived. New threads and replies may not be made. All add-ons/resources that are active should be migrated to the Resource Manager. See this thread for more information.

[8wayRun.Com] XenPorta (Module Add-Ons)

Jaxel

Well-known member
I am making this as a separate thread where people can post their add-ons for my portal...

XenPorta Base Package:
Official Modules (written by Jaxel):
  1. Board Totals
  2. Online Users
  3. Status Updates
  4. Share this Page
  5. Facebook
  6. Twitter
  7. Recent News
  8. Recent Threads
  9. Recent Slider
  10. Recent Accorsion
  11. Google Adsense
  12. Countdown
  13. Cover It Live
  14. Donations
  15. Amazon
  16. XenHabla Chat Users
  17. XenAtendo Birthdays
  18. XenAtendo Calendar
  19. XenAtendo Events Upcoming
  20. XenAtendo Live Stream
  21. XenMedio Media Cloud
  22. XenMedio Media Recent
  23. XenCarta Wiki Navigation
Unofficial Modules (written by other people):
  • none compatible with 1.5.0 yet.
If you want a module added to the list, just attach it to a post on this thread and then send me a private message...
 
Would be great to have a...
  1. Forum Listing Module (displaying a list of all available public forums).
  2. Activity Feed Module (a smaller briefer version of the activity feed page).
  3. Custom module (for putting your own stuff in there like advertisements or links).
 
Would love a Recent Videos/Recent Media module. This would pull the most recent videos posted in XenMedio.
 
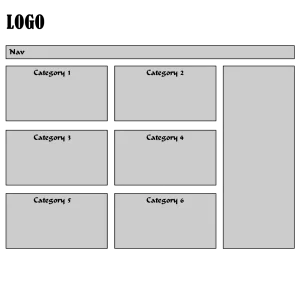
Okay... I would like to remind people of how EASY it is to create custom modules... and here is a new guide on template design... The next version of of XenPorta will have FIVE different locations for modules: top, bottom, left, center, and right. Naturally, the "right" location is the actual sidebar system built into XenForo; so the remaining four blocks are part of XenPorta... With each of the 5 locations, there are essentially TWO types of templates you can create: "section" content (sidebar stuff), and "sectionMain" content (main stuff).

First lets look at "sectionMain" content... In sectionMain content, there are several different types of containers you can use, the template below is an example of all four containers you should be using (you shouldn't use the "header" container, as that is a reserved container for the navbar and looks out of place in the default theme if used elsewhere)
Code:
<div class="sectionMain">
    <div class="subHeading"></div>
    <div class="primaryContent"></div>
    <div class="secondaryContent"></div>
    <div class="sectionFooter"></div>
</div>
Its actually very simple, subHeading is the top, sectionFooter is the bottom, and primaryContent/secondaryContent are alternating color schemes for content. Stick to this simple design and your sectionMain content will look fine no matter which location it is in; except for the "right". The "right" area is designed strictly for sidebar content.

Next lets look at "section" sidebar content... sidebar content is a bit more restrictive as there is an exact formatting you must follow in order to get it to fit the look of a sidebar module. First lets lay the ground rules... sidebar content can be placed in any of the highlighted modules below. If they are placed outside of these locations, their formatting will not be retained...

sidebar.webp

The following highlighted locations can NOT contain any "section" sidebar content. These are the spots in which formatting will not be maintained for sidebar content...

content.webp

the following highlighted locations are unique in that they can accept both "section" sidebar and "sectionMain" content. You can place any module in these spots, depending on how you wish to style your portal...

both.webp

Now lets look at the construction of a "section" sidebar module...
Code:
<div class="section">
    <div class="secondaryContent">
        <h3>Sidebar Title</h3>
        <div>Sidebar Content</div>
    </div>
</div>
Notice how you don't really have any options here. There are not 4 types of containers that you get to pick and choose from... here there are two containers, and you must use both of them. H3 is the title bar to the module, while the div below it is the actual content. Every sidebar module, including the ones built into XenForo follows this basic construct format!

Thank you for your time... I hope this makes it easier to create modules.
 
Creating a module for this was pretty easy, especially since I have no php skill.

Here is a very simple Daily Horoscope script provided free by Albino Blacksheep and Lexiyoga. Examples: http://www.lexiyoga.com/free-horoscope-code
The only problem with this script is that it doesn't offer any customization to it's colors or width.

So attached is a zip with 4 variations of the same script. You choose which you want to use based on your needs. There is 2 wide for light & dark sites, and 2 narrow for light & dark sites.

Let me know if I created this module properly or not. It seemed to work fine on my test site. The only thing that annoys me with it is that the title is displayed twice. Once by xF and once by the script itself. I cannot remove the header from the script, but I can omit it from xF.

What do you think? Leave it or remove it?

Next I plan to work on a random quote that pulls it's quotes from a text file.

Install as any other porta module. You don't need to use all four, just one based on where you want to place it and if your site has a dark theme or light theme.

If you like this script, please hit me with a "like".

Thank You.

EDIT: updated package
 

Attachments

Jaxel I have a question. I'm working on a random quotes module. It will call the quotes from a txt file. What directory should the txt file be placed? For teh sake of keeping everything as clean & organized as possible.
 
Here is a Christmas Countdown. I don't know how reliable it is since it was free scripts I found on the net that I combined. It has an image, with a daily countdown until Christmas and add's a snow effect to your webpage. Looks best as a side module.

Unzip the package and upload the ChristmasCoundown folder to your data directory. Then install as you would any other module.

Please like this post if you like the module.

Thanks.

EDIT: I didn't package my zip right. Please try this one.
EDIT: I found a bug in the script. It messes up sites in FF & IE.Removing package until I find a solution.
 
Here is a random quote module that pulls the quote from a text file. Open the package and upload the "RandomQuote" folder to the data directory. There is a quotes.txt to get you started so you can see how it works.

To create a random quotes file, simple add a quote and end the line with @. After each quote @ should be used to end the line or quote, EXCEPT FOR THE LAST LINE.

For example:
The sky is blue, the grass is green - unkown@
Life is like a box of chocolates, you never know what your gonna get. - Forest Gump@
This is the last quote, so it doesn't need a @.

Also, look at the quotes.txt file to see an example. Also, the file must be named "quotes.txt" in order for it to work. Everyone is welcome to share their quote files.

To be truthful, this can be used for a number of things. Like Random facts, etc...

If you like this module, please like this post.

Thank You.

EDIT: spruced up a new package, version 1.1screenshot_rq-1.webp . See screenshot.
EDIT #2: updated package.
EDIT #3: updated package.
 

Attachments

Xarcell, I'd like to spruce up the RandomQuote module text. How can we make the text larger, the author part in bold and add some small quote images around the text?
 
I spruced it up a bit, but not completely happy with it. NOTE: I cannot put author's name or piece of the text in bold.

Look at the screenshot and tell me what you think of the font?
 

Attachments

  • screenshot_rq-1.webp
    screenshot_rq-1.webp
    9.1 KB · Views: 306
Back
Top Bottom