You are using an out of date browser. It may not display this or other websites correctly.
You should upgrade or use an alternative browser.
You should upgrade or use an alternative browser.
Unmaintained Creating a add-on to insert tabs in profile page (using hooks)
- Author Fuhrmann
- Creation date
Step 11 - Creating the Model
As explained in the PART 3 of this tutorial:
Fuhrmann said:Model: In this layer are defined rules of access and manipulation of data, which often stored in databases or files, but nothing indicates that serve accommodation only for persistent data. Can be used for data in volatile memory, eg RAM, although such use does not happen very often. All rules related to treatment, obtaining and validating data must be implemented in this layer.
In this step we will create our Model.
But if i remember, we already have one, right? We created it in the PART 3 of this tutorial. Here we go:
- newProfileTabs
---- DataWriter
------- Notes.php
---- Extend
------- ControllerPublic
----------- Member.php
---- Model
------- newProfileModel.php (hey! It's our model!)
---- Installer.php
---- Listener.php
Yes we already have a Model! Let's open it?
You can notice that inside of our Model we still have the function of the third tutorial:getAllGivenLikesByUser. Since we do not be using this anymore, delete it. Your Model will be like this:
PHP:<?php class newProfileTabs_Model_newProfileModel extends XenForo_Model { } ?>
In Step 10 (creating a DataWriter) we call a function called getNoteById() but we still dont have declared it in our Model, see:
PHP:return array('xf_user_notes' => $this->_getProfileTabsModel()->getNoteById($id));
Now, its time to create it. With the newProfileModel.php Model opened lets add our first new function:
PHP:/** * Get a note by ID * @param integer $noteId */ public function getNoteById ($noteId) { return $this->_getDb()->fetchOne(' SELECT * FROM `xf_user_notes` AS notes WHERE note_id = ? ', $noteId); }
1. Gets the XenForo database object.
1.PHP:$this->_getDb()
2. We just want one row.
2.PHP:fetchOne
3. The SQl conditional says for itself: select all fields from our database, but only select the note who has the same ID we are passing into the function and return the row.
Next function!
Well, remember in Step 6 (when we defined our objectives):
"load all message notes that adminstrators/moderators given to the user."
We still have to create a query to get all notes of the user which we are seeing the profile. This functions could be called: getAllNotesReceivedByUserId(). Lets create then:
PHP:/** * Get all the notes that was received by a specific user * @param integer $userId */ public function getAllNotesReceivedByUserId ($userId) { return $this->_getDb()->fetchAll(' SELECT notes.*, user.user_id, user.username, user.gender, user.avatar_date, user.gravatar FROM xf_user_notes AS notes INNER JOIN xf_user as user ON (user.user_id = notes.given_user_id) WHERE received_user_id = ? ORDER BY notes.note_date DESC ', $userId); }
1. This time we want to fecht all the rows, not just one. So, lets use "fetchAll"
1.Code:fetchAll
2. With this query, we are selecting to the username, gender, avatar_date, gravatar to the user who GIVEN the note. Lets say:
Fuhr had wrote a note about Fuhrmann.
With this query lets take the note and all fields of it, the username, the gender, the avatar_date and the gravatar of Fuhr, so we can display a avatar later, in the result page.
Next function: prepareNotes(). Since we are selecting some fields from the xf_user table, lets put all those in a array, then we can call with something like that: $notes.user.username. This functions doest that:
PHP:/** * Prepare the array user in the notes */ public function prepareNotes(array $notes) { foreach ($notes as &$note){ $note['user'] = XenForo_Application::arrayFilterKeys($note, array( 'user_id', 'username', 'gender', 'gravatar', 'avatar_date', )); unset($note['user_id'], $note['username'], $note['gender'], $note['gravatar'], $note['avatar_date']); } return $notes; }
1. Here we unset this keys in array, since we already put them in $note['user'].
1.PHP:unset($note['user_id'], $note['username'], $note['gender'], $note['gravatar'], $note['avatar_date']);
If you want to know more about arrayFilterKeys go to library/XenForo/Application.php.
This is the final code:
PHP:<?php class newProfileTabs_Model_newProfileModel extends XenForo_Model { /** * Get a note by ID * @param integer $noteId */ public function getNoteById ($noteId) { return $this->_getDb()->fetchOne(' SELECT * FROM `xf_user_notes` AS notes WHERE note_id = ? ', $noteId); } /** * Get all the notes that was received by a specific user * @param integer $userId */ public function getAllNotesReceivedByUserId ($userId) { return $this->_getDb()->fetchAll(' SELECT notes.*, user.user_id, user.username, user.gender, user.avatar_date, user.gravatar FROM xf_user_notes AS notes INNER JOIN xf_user as user ON (user.user_id = notes.given_user_id) WHERE received_user_id = ? ORDER BY notes.note_date DESC ', $userId); } /** * Prepare the array user in the notes */ public function prepareNotes(array $notes) { foreach ($notes as &$note){ $note['user'] = XenForo_Application::arrayFilterKeys($note, array( 'user_id', 'username', 'gender', 'gravatar', 'avatar_date', )); unset($note['user_id'], $note['username'], $note['gender'], $note['gravatar'], $note['avatar_date']); } return $notes; } } ?>
Step 12 - Creating the Controller
In the past tutorial we have wrote a extended Controller with the name of Member.php, remember? See THIS.
So, lets find it:
- newProfileTabs
---- DataWriter
------- Notes.php
---- Extend
------- ControllerPublic
----------- Member.php (here i am! The extended Controller!)
---- Model
------- newProfileModel.php
---- Installer.php
---- Listener.php
We want to use the same controller because the URL of our "Notes" will be: index.php?members/fuhrmann.1/notes but we will not access direcly. Only throug the tab.
Open it. You should seeing now a action called actionUsersLike(). You dont need it anymore. Lets delete and this is what we will get after delete:
PHP:<?php class newProfileTabs_Extend_ControllerPublic_Member extends XFCP_newProfileTabs_Extend_ControllerPublic_Member { } ?>
Remember that in DataWriter we used a function that help us to get a instance of our Model? The name was _getProfileTabsModel(); So lets use it here too. In the Controller. Your file should be like this:
PHP:<?php class newProfileTabs_Extend_ControllerPublic_Member extends XFCP_newProfileTabs_Extend_ControllerPublic_Member { /** * @return newProfileTabs_Model_newProfileModel */ protected function _getProfileTabsModel() { return $this->getModelFromCache('newProfileTabs_Model_newProfileModel'); } } ?>
Ok. We need now to create a action to do what we want. We want to load in the tab content of the profile, all the notes that admin/mod have wrote about some user. Lets call the acion "Notes" (index.php?members/fuhrmann.1/notes). So the action will be this:
PHP:/** * Action to load all the users notes given by admin/moderators. */ public function actionNotes() { }
So far, so good? Ok, lets move on. What we want to do? When a admin/mod open the tab "Notes" the input and the button send appears and below, all the notes that was given to the user.
We need to find a way to load all of this data and put in our template!
But, wait! We already got it! In the Model! I remember! The function isgetAllNotesReceivedByUserId! Nice, one guys. So, the complete action is this:
PHP:/** * Action to load all the users notes given by admin/moderators. */ public function actionNotes() { //Get the model $notesModel = $this->_getProfileTabsModel(); //Filtering the user ID in the url $userId = $this->_input->filterSingle('user_id', XenForo_Input::UINT); //Get more fields $user = $this->getHelper('UserProfile')->assertUserProfileValidAndViewable($userId); //get all notes that was given to this user with this id $notes = $notesModel->getAllNotesReceivedByUserId($userId); //Prepare the user array $notes = $notesModel->prepareNotes($notes); /*Returning all the values to our template newProfileTab_ourTab_content with the variables $notes, and $user.*/ $viewParams = array( 'notes' => $notes, 'user' => $user, ); return $this->responseView( 'XenForo_ViewPublic_Base', 'newProfileTab_ourTab_notes', $viewParams ); }
Explaining:
1. Here we get the object of our Model, with the function _getProfileTabsModel. This way we can use all the functions inside the Model, and that's what we want. This is just a little help to us.
1.PHP:$notesModel = $this->_getProfileTabsModel();
2. Lets get the user_id of the user profile page, because we want to query the database for all the notes of this user! How this works? like this:
We have this URL: index.php?members/fuhrmann.1/notes
So the number 1 is our user_id. More explanation of this, maybe in other tutorial, this is about rout/prefixes.
2.PHP:$userId = $this->_input->filterSingle('user_id', XenForo_Input::UINT);
3. Here! We're using it! Our function! Oh...thats so nice. (i hope this works). Remember this function, eh? We have declared it in the Model that we've created. Get all the notes that was given to a certain user (usre_id).
3.PHP:$notes = $notesModel->getAllNotesReceivedByUserId($userId);
4. This is our response. We are returning two variables. The $user and the $notes to the templatenewProfileTab_ourTab_content, which is the template we wanna show the content we are making a query.
4.PHP:return $this->responseView( 'XenForo_ViewPublic_Base', 'newProfileTab_ourTab_content',array('user' => $user, 'notes' => $notes) );
"So, that's it!"
Almost! But you can try, to see if its working. Go to any profile page, click in the tab "Notes" and see the action working.
This is what we'll got:

But, wait, we have more. We still want to do something more that we haven't yet declared a controller. The "send" action. We want to send the notice to the user, right? But how?
Oh, this is almost the same thing about the other controller. We can do this using a route/prefix, but that is not the way i will do.
Lets create another action inside our extended Member Controller:
PHP:/** * Action to send a note to the specified user. */ public function actionSendNote() { }
With this action we need to get:
note message (note_message)
note date (note_date)
user who is given the note (given_user_id)
user who is receiving the note (received_user_id)
But how? Think with me: In our template newProfileTab_ourTab_notes we put one input text field and one button to submit the data. So here we have the message and the button to make this action happen. The others fields we gonna filter in other way.
Here is the final code of the action SendNote, below explained:
PHP:/** * Action to send a note to the specified user. */ public function actionSendNote() { //Make sure we are using a method form POST not GET $this->_assertPostOnly(); //Lets get the ID of the user who is given the note $visitor = XenForo_Visitor::getInstance()->toArray(); //The user ID who has received the note $userId = $this->_input->filterSingle('user_id', XenForo_Input::UINT); //Get the message content $note_message = $this->_input->filterSingle('note_message', XenForo_Input::STRING); //The date of the note given $note_date = XenForo_Application::$time; //Instance the DataWriter $dw = XenForo_DataWriter::create('newProfileTabs_DataWriter_Notes'); $dw->set('given_user_id', $visitor['user_id']); $dw->set('received_user_id', $userId); $dw->set('note_message', $note_message); $dw->set('note_date', $note_date); $dw->save(); $note = array('user' => $visitor, 'note_message' => $note_message, 'note_date' => $note_date); $viewParams = array( 'note' => $note ); return $this->responseView('XenForo_ViewPublic_Base', 'newProfileTab_ourTab_newnote', $viewParams); }
Explaining:
1. This make sure that the access to this action is only via POST.
1.PHP:$this->_assertPostOnly();
2. Here we got the visitor. The user who is writing the note, a administrator ou moderator. We use "toArray" because "getInstance" returns a object. But we want a array.
2.PHP:$visitor = XenForo_Visitor::getInstance()->toArray();
3. Here we got the ID of the user. This is the user who is receiving the note. The user of the profile page.
3.PHP:$userId = $this->_input->filterSingle('user_id', XenForo_Input::UINT);
4. The note message. Remember, we got a input text field in our content template with the name of "note_message".
4.PHP:$note_message = $this->_input->filterSingle('note_message', XenForo_Input::STRING);
5. The date of the note. If you want know more about it, open library/XenForo/Application.php and search "$time".
5. $note_date = XenForo_Application::$time;
6. Well, well! We are using our DataWriter that we created!
6.PHP:$dw = XenForo_DataWriter::create('newProfileTabs_DataWriter_Notes');
7. Here we set each field with each value we get. Then, we save it.
7.PHP:$dw->set('given_user_id', $visitor['user_id']); $dw->set('received_user_id', $userId); $dw->set('note_message', $note_message); $dw->set('note_date', $note_date); $dw->save();
8. We fill a variable $viewParams with a array of all the data we used in this action. With this, we can send then to our template to use it as response.
8.PHP:$note = array('user' => $visitor, 'note_message' => $note_message, 'note_date' => $note_date); $viewParams = array( 'note' => $note );
9. This is the respose. We did it before in the actionNotes(). We are passing the parameters to the template 'newProfileTab_ourTab_newnote'. We still dont have created this template, but we will. Dont worry.
9.PHP:return $this->responseView('XenForo_ViewPublic_Base', 'newProfileTab_ourTab_newnote', $viewParams);
You can see the final code of the file Member.php here.
Step 13 - Testing
Ok! Time to test!
Go to any profile page.
Click in the "Notes" tab.
Write a note in the input text field.
Click send.
You will receive a page, without any info. Just with the navbar of xenforo and a title "XenForo", right?

That's because the response for the action we did (sendnote) stil doest not have the template response created.
Now, go back to the profile.
Click in the tab Notes again.
See? It works. Our DataWriter have inserted into the database a new record:

So, besides the DataWriter working, we have our Model working and still the Controller with the two actins. All working. (i said that would be a pleasure when all got working)
Step 14 - New template
We now have the Controller with our actions. In the acionSendNote we have a responseView with a template that does not exists yet. We need to create, because we want to do this:
- Administrator write the note
- Click Send
- The note is appended above other notes in the page
This template will be responsable to show the new note wrote by some user.
Go to your AdminCP>Appearance>Templates and click the button "Create New Template".
Template Name: Give the name newProfileTab_ourTab_newnote
Now the template will be something like this:
PHP:<li> <ol> <li class="searchResult post primaryContent"> <xen:avatar user="$note.user" size="s" class="icon" /> <div class="listBlock main"> <blockquote class="snippet"> {$note.note_message} </blockquote> <div class="meta"> Note by: <xen:username user="$note.user" rich="true" />, in <xen:datetime time="{$note.note_date}" /> </div> </div> </li> </ol> </li>
Add-on: Choose our add-on "New Profile Tabs".
Save it.
"What this template does?"
This simple shows the content of the note that we recently wrote.
Step 14 - Testing again
So, FINALLY! Let's see if the template show us our note?
Go to any profile page, make sure you are logged as a administrator ou moderator
Go to the tab "Notes".
Write a message.
Click "Send".
This is what we got, right?

All working fine!(i hope)
This is a bit ugly, eh? Why we just dont make some more "jqueryistic"?
Step 15 - Applying jquery!
We can use jquery to load our message sent directly to the template that we are actually send the message.
I am not going to explain detailed the jquery actions line by line. If you want to know more about AJAX calls, jquery, see this.
So, go to to your root installation of XenForo. Open the js folder:
-- data
-- install
-- internal_data
-- js (itsme, itsme!)
-- library
-- styles
Inside the js folder, lets create a new folder and rename to the name of our add-on: "newProfileTabs"
Get into the new folder newProfileTabs and create a new file, called notes.js. Open your new file.
The basic code to make this work:
PHP:/** @param {jQuery} $ jQuery Object */ !function($, window, document, _undefined) { } (jQuery, this, document);
Ok, what we want to do?
We want to bind the "submit" action on our form.
Get the template response.
Append in the actual template.
Back there, in the Step 8, we create a new template and put a input type and a send button. And, we declared a form:
PHP:<form action="{xen:link members/sendnote, $user}" method="POST" name="NoteForm" id="NoteForm">
We need to use it ID attribute so we can tell jquery what to look for the submit.
This is the second part:
PHP:/** @param {jQuery} $ jQuery Object */ !function($, window, document, _undefined) { XenForo.NoteForm = function($form) { }; XenForo.register('#NoteForm', 'XenForo.NoteForm'); } (jQuery, this, document);
1. You can put any name here. We will using the same as ID attribute of this form.
1.PHP:XenForo.NoteForm
2. We need to register so the function will be called. Our form have a ID attribute "#NoteForm". So we use it.
2.PHP:XenForo.register('#NoteForm', 'XenForo.NoteForm');
Next step: define the what we'll do:
PHP:/** @param {jQuery} $ jQuery Object */ !function($, window, document, _undefined) { XenForo.NoteForm = function($form) { $form.submit(function(e) { e.preventDefault(); alert('test'); return false; }); }; XenForo.register('#NoteForm', 'XenForo.NoteForm'); } (jQuery, this, document);
This is just a test. But to make this work, we need to require this js in the template file.
Open the template newProfileTab_ourTab_notes and below this:
Code:<xen:require css="search_results.css" />
Add this:
Code:<xen:require js="js/newProfileTabs/notes.js" />
We are now requiring the JS that we created to make work into the form in template.
Go to any profile page. Click the "Notes" tab. Dont need to write anything, just click in the "Send" button.

Ok, we got it working, now lets do the real thing. Open the notes.js file and lets write our action:
PHP:$form.submit(function(e) { e.preventDefault(); serialized = $form.serializeArray(); XenForo.ajax($form.attr('action'), serialized, function(ajaxData) { $(ajaxData.templateHtml).xfInsert('insertAfter', $form, 'xfSlideDown', XenForo.speed.slow); }); return false; });
1. Prevent the default action of the form being trigged
1.PHP:e.preventDefault();
2. Encode a set of form elements as an array of names and values.
2.PHP:serialized = $form.serializeArray();
3. Here we make a ajax request, to the attribute "action" of our form, send the serialized data. "ajaxData" is the data returned.
3.PHP:XenForo.ajax($form.attr('action'), serialized, function(ajaxData)
4. Here we:
Got our response template (ajaxData.templateHtml)
Insert in some place (xfInsert)
Where? After some object (insertAfter)
Which object? (our $form)
The effect? (xfSlideDown)
And set the speed of the effect. (XenForo.speed.slow)
4.PHP:$(ajaxData.templateHtml).xfInsert('insertAfter', $form, 'xfSlideDown', XenForo.speed.slow);
This is a more and less explanation.
The complete final code of the file notes.js:
PHP:/** @param {jQuery} $ jQuery Object */ !function($, window, document, _undefined) { XenForo.NoteForm = function($form) { $form.submit(function(e) { e.preventDefault(); serialized = $form.serializeArray(); XenForo.ajax($form.attr('action'), serialized, function(ajaxData) { //$(ajaxData.templateHtml).xfInsert('prependTo', $form); $(ajaxData.templateHtml).xfInsert('insertAfter', $form, 'xfSlideDown', XenForo.speed.slow); }); return false; }); }; XenForo.register('#NoteForm', 'XenForo.NoteForm'); } (jQuery, this, document);
Step 16 - Its done!
Ok! Lets test. Go to any profile page, click in the "Notes" tab.
Write a message and click send.
It should show a animation of your message appending right after the form.
Hope you like it. This took me two days! Cheers!

Hey guys! DaveL just give me some tips about the next part:
Also, I dont know if you planned to create any more tutorials, but another interesting one based on the profile tab with the permissions you went through would be a "member notes" kind of add on.
Usergroups with permissions (admins/mods) can only see the tab on users profiles. Each tab has a text input box similar to that of the "profile posts" tab. Admins/Mods could then post a note which would only show to other Admins/Mods underneath the input box.
So, let's do it!
So, in this part we gonna change the content of our tab . No more "user's like". Our tab will have now a input text, which only admin/moderators can see, and write down some notes about the user. We'll call our tab "Notes".
Step 1 - Where to save the content?
Let's see: We now will have a tab that hold some notes about some user. Looking this way, we know we'll have some place to save this notes. But where?
Yes, in database. You can define the fields and which way you prefer to create it, but we will following this:
Table: xf_user_notes
Fields:
note_id -> Auto-increment field, this is the id of every note;INT (10)
given_user_id -> The user who is giving the note;INT (10)
received_user_id -> The user who is receiving the note;INT (10)
note_message-> The message of the note;VARCHAR (255)
note_date-> When the note was given to the received_user_id;INT(10)
Now we know how our new database will look like, we need to create it.
Step 2 - Explaining the Installer
Knowing that now we'll use a database, we need to a installer. So what this mean? Mean that the installer will create our database every time someone install our addon.
- User download our add-on
- User install our add-on
- Installer create all the databases our add-on needs
- User start to use the add-on.
- User want to uninstall our add-on
- Installer has a function called "uninstall" so the created tables will drop since the user dont need them anymore.
- Fin.
See? The installer has two basics methods: Install and Uninstall.
Inside the Installer we will declare all database structure we want to create. Let's do it.
Step 3 - Creating the installer
This is what we have so far in our directories structure:
- newProfileTabs
---- Extend
------- ControllerPublic
----------- Member.php
---- Model
------- newProfileModel.php
---- Listener.php
Go to the folder of our add-on "newProfileTabs" and create a new file. Name it as "Installer.php". So, this is what we'll have:
- newProfileTabs
---- Extend
------- ControllerPublic
----------- Member.php
---- Model
------- newProfileModel.php
---- Installer.php (our new file!)
---- Listener.php
"What's next? How i suposed to know what i have to write in this file?"
You may ask. Well, remember in the last tutorial (PART 3) we looking inside the files of XenForo? So, lets do the same! Since XenForo has installed in your computer (or website) we know that XenForo have a installer too! What about we take a look at it, so we can grab some code and make our own installer?
Looking inside the folder library/Xenforo we see a folder:
Install
Open it. We know got more and more folder and files. Each folder: more files. Well, the best way is looking to one by one file and see if we got what we want, some file which has declarations of database structure...
..... (looking inside the files)......
WAIT! GOTCHA! We found! I found it, i found it!
Open the Data folder, it is in library/XenForo/Install/Data. Check the file MySql.php:
PHP:$tables = array(); $tables['xf_addon'] = " CREATE TABLE xf_addon ( addon_id VARCHAR(25) NOT NULL, title VARCHAR(75) NOT NULL, version_string VARCHAR(30) NOT NULL DEFAULT '', version_id INT UNSIGNED NOT NULL DEFAULT 0, url VARCHAR(100) NOT NULL, install_callback_class VARCHAR(75) NOT NULL DEFAULT '', install_callback_method VARCHAR(75) NOT NULL DEFAULT '', uninstall_callback_class VARCHAR(75) NOT NULL DEFAULT '', uninstall_callback_method VARCHAR(75) NOT NULL DEFAULT '', active TINYINT UNSIGNED NOT NULL, PRIMARY KEY (addon_id), KEY title (title) ) ENGINE = InnoDB CHARACTER SET utf8 COLLATE utf8_general_ci ";
I think we got luck, eh?
Now we have a example code, we can make our code. Open the Installer.php. First, as always we need to put a name in our file class. Let's do it:
PHP:// folder/file // Following the directories structure class newProfileTabs_Installer { }
Now, the query for the installer create our table. Since we got a example, that's not to dificult to make our own query:
PHP:protected static $table = array( 'createQuery' => 'CREATE TABLE IF NOT EXISTS `xf_user_notes` ( `note_id` int(10) NOT NULL AUTO_INCREMENT, `given_user_id` int(10) NOT NULL, `received_user_id` int(10) NOT NULL, `note_message` VARCHAR(255) NOT NULL, `note_date` int(11) NOT NULL, PRIMARY KEY (`note_id`) ) ENGINE = InnoDB CHARACTER SET utf8 COLLATE utf8_general_ci;', 'dropQuery' => 'DROP TABLE IF EXISTS `xf_user_notes`' );
Note that we have a array $table. Inside we have 'createQuery' and 'dropQuery'. We gonna execute each one for the install() and uninstall() methods respectively.
So, let's create our install method:
PHP://Create the database public static function install() { //We get here the instance of the XenForo db $db = XenForo_Application::get('db'); //Tell the db to query our 'createQuery', remember? $db->query(self::$table['createQuery']); }
That's it. We have our install function. Easy eh? How do you guess that we be our uninstall function? That's pretty more easy and almost the same:
PHP://Drop the database public static function uninstall() { //We get here the instance of the XenForo db $db = XenForo_Application::get('db'); //Tell the db to query our 'dropQuery', because we are uninstalling. $db->query(self::$table['dropQuery']); }
See? We just changed the 'createQuery' to 'dropQuery'!
Our installer is finished:
PHP:<?php// folder/file // Following the directories structure class newProfileTabs_Installer { protected static $table = array( 'createQuery' => 'CREATE TABLE IF NOT EXISTS `xf_user_notes` ( `note_id` int(10) NOT NULL AUTO_INCREMENT, `given_user_id` int(10) NOT NULL, `received_user_id` int(10) NOT NULL, `note_message` VARCHAR(255) NOT NULL, `note_date` int(11) NOT NULL, PRIMARY KEY (`note_id`) ) ENGINE = InnoDB CHARACTER SET utf8 COLLATE utf8_general_ci;', 'dropQuery' => 'DROP TABLE IF EXISTS `xf_user_notes`' ); //Create the database public static function install() { //We get here the instance of the XenForo db $db = XenForo_Application::get('db'); //Tell the db to query our 'createQuery', remember? $db->query(self::$table['createQuery']); } //Drop the database public static function uninstall() { //We get here the instance of the XenForo db $db = XenForo_Application::get('db'); //Tell the db to query our 'dropQuery', because we are uinstalling. $db->query(self::$table['dropQuery']); } } ?>
Step 4 - Put the installer to work
The installer is in there. But is not working yes, because we did not associate with any add-on. To do this, open your AdminCP>List Add-ons. Click in our add-on "New Profile Tabs". The part that matters to us is this:

Installation Code:
-----> First field: In the first field, we need to put our installer name class. We used newProfileTabs_Installer.
-----> Second field: In the second field, we put the method name to install: "install"
Uninstallation Code:
-----> First field: In the first field, we need to put our installer name class. We used newProfileTabs_Installer.
-----> Second field: In the second field, we put the method name to uninstall: "uninstall"
Hit "Save Add-on. With this we associate our two functions with the install and uninstall callbacks for the add-on.
Step 5 - It's working?
Go to your AdminCP>List Add-ons again and next to our add-on exist a "Control" button. Click it. Will open a menu, with some options. Choose the option "Export" and save in some place you want. I will save in my "C:\" just for a easy access. The name is "addon-newProfileTabs.xml".
Why do this? Because we want to uinstall our add-on and install again, to see if the table we want will be created, so this way, we will not lose any template we made. After exported, go to the button "Controls" again and click "Uninstall".
Confirm.
We now are able to install again and see if the install() method works.
Go to your AdminCP>Install Add-On and select the .xml that we exported before. (mine's in "C:\addon-newProfileTabs.xml"). Click "Install Add-on" and wait. (no errors should appear).
Is all occurs well, go to PHPMyAdmin of your website or test site and see if the tables exists:

Yes, it worked. I hope you can get to work in there too.
Step 6 - Defining our objectives
Now that we have our database created and the new installer working, lets develop the rest.
Before continue let's review what we want to do:
1. Rename our profile tab to "Notes". To make the correct thing, lets create a phrase to hold that.
2. Change our template newProfileTab_ourTab_content
3. Create a new template to put a input text field in our tab content and a "Send" button and to hold our data.
4. Let only Administrators and Moderators see the notes in the tab and the tab.
5. Create a DataWriter to manipulate data
6. Create a model to hold all rules and definitions to our action.
7. Create a Controller for this action.
8. Below the input text field, load all message notes that adminstrators/moderators given to the user.
So, let's do it!
Step 7 - Rename our profile tab to "Notes"
We have two templates, so long in the PART 1 we created them. Here they are again:
newProfileTab_ourTab -> the main tab. This is where the user click to see the tab.
newProfileTab_ourTab_content -> The content of the tab. When user click on the tab, see this template.
Open the newProfileTab_ourTab. You got this:
PHP:<li><a href="{$requestPaths.requestUri}#ourTab">Our Tab</a></li>
In this step we'll change "Our Tab" to "Notes" because that's what the tab will do. Show notes. Before continue, lets talk about phrases. The right way to print phrases to yours templates it's creating them. Instead of write directly the phrase to the template, let's create a new phrase in the menu Phrases and after append it in the template.
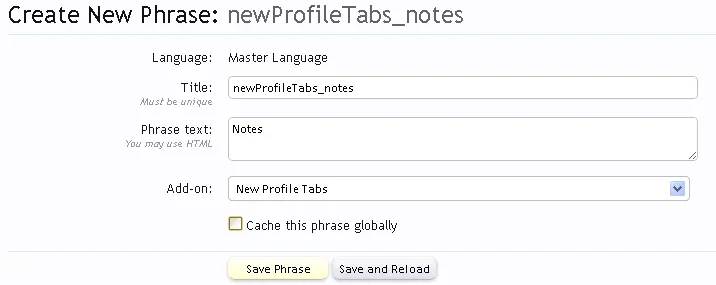
So, for now, go to AdminCP>Appearance>Phrases. Click the button "Create New Phrase". It will open a new page and i suggest you to fill with this:
Title: This is the title of the phrase. You can put anything you want in here, but for the pattern design lets always start a phrase with the name of our add-on. Our final phrase is: "Notes". So, the title will be newProfileTabs_notes.
Phrase text: Here we put the phrase. "Notes".
Add-on: As always we have to select which add-on pertences this phrase. Select New Profile Tabswhich is ours.
Cache this phrase globally: Dont need to check this. This is only required if you want to use this phrase outside the template (via code).
View attachment 20086
Now, open the template newProfileTab_ourTab and let's append the new phrase to this. For print out phrases we use this code:
Code:{xen:phrase TITLE_OF_THE_PHRASE}
This is the final template after changing the "Our Tab" to the new phrase:
PHP:<li><a href="{$requestPaths.requestUri}#notes">{xen:phrase newProfileTabs_notes}</a></li>
Note that i change too the "#ourTab" to "#notes". You can open any profile page and see if the tabs has been renamed to "Notes".
Step 8 - Input text field and "Send" button
Open the content template of our tab. (newProfileTab_ourTab_content)
We got that:
PHP:<xen:require css="search_results.css" /> <li id="ourTab" class="profileContent" data-loadUrl="{xen:link members/userslike, $user}"> <xen:if is="{$users_likes}"> <xen:foreach loop="$users_likes" value="$like"> <ol> <li class="searchResult post primaryContent" data-author="{$bookmark.user.username}"> <div class="listBlock main"> <div class="titleText"> <h3 class="title"><a href="posts/{$like.post_id}/">{$user.username} liked the post of {$like.receive_username}:</a></h3> </div> <blockquote class="snippet"> {xen:helper snippet, $like.message, 150} </blockquote> <div class="meta"> Post by: <xen:username user="{$like}" rich="true" />, Liked in <xen:datetime time="{$liked_content.like_date}" /> </div> </div> </li> </ol> </xen:foreach> <xen:else /> <p>This user not liked any content yet.</p> </xen:if> </li>
Lets Change our template newProfileTab_ourTab_content to:
PHP:<li id="notes" class="profileContent" data-loadUrl="{xen:link members/notes, $user}"> {xen:phrase loading}... <noscript><a href="{xen:link members/notes, $user}">{xen:phrase view}</a></noscript> </li>
1. In the tutorial part 3, i already teach you guys about the data-loadUrl. The {xen:link members/notes, $user} will create a link like this: index.php?members/fuhrmann.1/notes, this is where our content will be loaded.
1.Code:data-loadUrl="{xen:link members/notes, $user}"
Now lets create another template, which will contain the input text field, a send button and will hold our data. Go to your AdminCP>Appareance>Templates>Create New Template.
Title of the template: newProfileTab_ourTab_notes
The final code is:
PHP:<xen:require css="search_results.css" /> <div id="notes"> <form action="{xen:link members/sendnote, $user}" method="POST" name="NoteForm" id="NoteForm"> <input type="text" value="" name="note_message" class="textCtrl" style="width:80%"/> <input type="submit" value="Send" accesskey="s" class="button primary"> <input type="hidden" name="_xfToken" value="{$visitor.csrf_token_page}" /> </form> <xen:foreach loop="$notes" value="$note"> <li> <ol> <li class="searchResult post primaryContent"> <xen:avatar user="$note.user" size="s" class="icon" /> <div class="listBlock main"> <blockquote class="snippet"> {$note.note_message} </blockquote> <div class="meta"> Note by: <xen:username user="$note.user" rich="true" />, in <xen:datetime time="{$note.note_date}" /> </div> </div> </li> </ol> </li> </xen:foreach> </div>
1. This is the where whe will send the data after we click in the "Send" button. The "{xen:link members/sendnote, $user}" create this link: "index.php?members/fuhrmann.1/sendnote. Which "sendnote" will be our action defined inside the controller. Dont worry if you are not understanding this right now.
1.Code:action="{xen:link members/sendnote, $user}"
2. Our input text field to hold the message.
2.PHP:<input type="text" value="" name="note_message" class="textCtrl" style="width:80%"/>
3. The send button.
3.PHP:<input type="submit" value="Send" accesskey="s" class="button primary">
4. This is a token. For security reasons.
4.PHP:<input type="hidden" name="_xfToken" value="{$visitor.csrf_token_page}" />
5. This part maybe get a little bit strange for you, but here we define our loop throug all the notes that we will load. This will get explained more later.
5.Code:<xen:foreach loop="$notes" value="$note">
This is the code that will print the data of all notes (using foreach). There is a avatar, the username and the note sent. Dont worry, i explain more later.
PHP:<li> <ol> <li class="searchResult post primaryContent"> <xen:avatar user="$note.user" size="s" class="icon" /> <div class="listBlock main"> <blockquote class="snippet"> {$note.note_message} </blockquote> <div class="meta"> Note by: <xen:username user="$note.user" rich="true" />, in <xen:datetime time="{$note.note_date}" /> </div> </div> </li> </ol> </li>
Chosse in the "addon-on" option, our add-on "New Profile Tabs".
And if you go to any profile page and click in the "Notes" tab:

This message. What is this? Well, this means that we still dont have any actions called "Notes" in the Member Controller.
When the tab is clicked, the data-loadUrl get all the content from the url index.php?members/fuhrmann.1/notes. But, we still does not have the /notes action to pass any data throug the template.
We will define it later.
Step 9 - Administrators and Moderators
In this step we'll limit the access to the "Notes" tab. Remember we had a tutorial explaining this?
This is the conditional we'll use:
Code:<xen:if is="{$visitor.is_admin} OR {$visitor.is_moderator}"> </xen:if>
So, we have to change only one template. Open newProfileTab_ourTab and let's add the code to check if the user is admin or moderator:
PHP:<xen:if is="{$visitor.is_admin} OR {$visitor.is_moderator}"> <li><a href="{$requestPaths.requestUri}#notes">{xen:phrase newProfileTabs_notes}</a></li> </xen:if>
You may ask: "But what about the template data hold the content of this tab?"
We dont need to limit access, because the content of this data only load when someone click it. If you go to the any profile page, but dont click the tab "Notes", inspect the page, you'll see this:

You can logout and test if it works.
Step 10 - Create a DataWriter to manipulate data
A DataWriter in a basic explanation:
Shadab said:As the name suggests, a datawriter is responsable for manipulating data. ie, it would handle insertion, updation and deletion of data from the database. One thing you'd notice is a datawriter handles one row at a time. So unlike your Model from which you can select a bunch of rows in one go; a datawriter can manipulate a single row of data, only. Using a datawriter to manipulate data has an added benefit of maintaining integrity of your data.
Why we want a DataWriter? Because we will be making insertions into the database, updating, deletes and that's why DataWriter is in there. We can use it.
You have to create one folder and one file to this DataWriter. This is how your main folder "newProfileTabs" will look like:
- newProfileTabs
---- DataWriter (new folder!)
------- Notes.php (new file!)
---- Extend
------- ControllerPublic
----------- Member.php
---- Model
------- newProfileModel.php
---- Installer.php
---- Listener.php
The basic usage of a DataWriter:
PHP:$dw = XenForo_DataWriter::create('NAME_OF_DATA_WRITER_CLASS'); $dw->set('field', $newValue); $dw->save();
After this, lets analise one single example file of a DataWriter in XenForo. To open it, go to library/XenForo/DataWriter and open Poll.php. In this folder you can see other bunch of datawriters. But let's use this just to look inside.
1. As you can see the DataWriter Poll have a class name that extends to a abstract class called XenForo_DataWriter.
1.PHP:class XenForo_DataWriter_PollResponse extends XenForo_DataWriter
2. As the name says this function get all the fields defined for our table and define some types. If you add some new fields to the table, you have to make sure you'll update this file.
2.PHP:protected function _getFields()
3. "Gets the actual existing data out of data that was passed in." So, when we use a DataWriter we can update the fields too, instead of just insert a new row. This function make sure that you can update a record that already exists. Grab the content for the existing record so we can update.
3.PHP:protected function _getExistingData($data)
4. If you want to update a row, you must have a update condition. In this example the conditional is "WHERE poll_id = ". In our case will be "WHERE note_id = ".
4.PHP:protected function _getUpdateCondition($tableName)
5. Jumping off some custom functions of the Poll DataWriter, we have this: The preSave function. This always occurs BEFORE any $dw->save() we do. You can use the preSave function to validate some parameters.
5.PHP:protected function _preSave()
6. This function always occurs AFTER we call the $dw->save() function. We can add extra data in other fields and other things.
6.PHP:protected function _postSave()
7. This function always occurs AFETER we call the $dw->delete() function. We can call other functions, delete data from others tables and other things.
7.PHP:protected function _postDelete()
After this simple explanation, i think we can make our own DataWriter.
So, open the file Notes.php we've created. Lets name the class:
PHP:<?php //Following the directorie structure, remember? class newProfileTabs_DataWriter_Notes extends XenForo_DataWriter { } ?>
Now, the _getFields functions. so the DataWriter will know which fields our database have. You can open our Installer.php file and copy all the fields of database and apply they here, as i did below:
PHP:/** * Gets the fields that are defined for the table. See parent for explanation. * * @return array */ protected function _getFields() { return array( 'xf_user_notes' => array( 'note_id' => array('type' => 'uint', 'autoIncrement' => true), 'given_user_id' => array('type' => 'uint', 'required' => true), 'received_user_id' => array('type' => 'uint', 'required' => true), 'note_message' => array('type' => 'string', 'required' => true), 'note_date' => array('type' => 'uint', 'default' => XenForo_Application::$time) ) ); }
The next function we'll make is [/i]_getExistingData($data)[/i], so when we want to update a certain row in database, the DataWriter do the job for us and grab the row we want to update so we can do it.
First makes a call to the _getExistingPrimaryKey(), which gets the primary key from either an array of data or just the scalar value. So, we pass a array with data, then the _getExistingPrimaryKey gets the primaryKey and put in the $id var, so we can use to get all the data of the existing row just with the value of the primary key.
PHP:/** * Gets the actual existing data out of data that was passed in. See parent for explanation. * * @param mixed * * @return array|false */ protected function _getExistingData($data) { if (!$id = $this->_getExistingPrimaryKey($data, 'note_id')) { return false; } return array('xf_user_notes' => $this->_getProfileTabsModel()->getNoteById($id)); }
You may ask now: "What is this "_getProfileTabsModel()" and "getNoteById()" ??"
And i answer: We have not implemented this yet, because we are making the DataWriter, but when we got in the creating of the Model i will explaing more. For now, lets say the "_getProfileTabsModel" is a function present here, in DataWriter, but did'nt write this yet. It gets our Model that we will create in other step and use all functions of it. And the getNoteById(), which is a function of our future Model will fetch one unique row just with the ID of the note.
The next funcion is the _getUpdateCondition(). It gets a SQL condition to update the existing record. As i explained above. So it will be:
PHP:/** * Gets SQL condition to update the existing record. * * @return string */ protected function _getUpdateCondition($tableName) { return 'note_id = ' . $this->_db->quote($this->getExisting('note_id')); }
The next function is in DataWriter too, but it can be in any other file, just to help the call to any funcions inside our model. Remember that we already have a model? We made it in the part 3 of this tutorial. The name is newProfileTabs_Model_newProfileModel.
If you don't remember, see THIS.
PHP:/** * @return newProfileTabs_Model_newProfileModel */ protected function _getProfileTabsModel() { return $this->getModelFromCache('newProfileTabs_Model_newProfileModel'); }
For the DataWriter, that's it. This is the final code:
PHP:<?php class newProfileTabs_DataWriter_Notes extends XenForo_DataWriter { /** * Gets the fields that are defined for the table. See parent for explanation. * * @return array */ protected function _getFields() { return array( 'xf_user_notes' => array( 'note_id' => array('type' => 'uint', 'autoIncrement' => true), 'given_user_id' => array('type' => 'uint', 'required' => true), 'received_user_id' => array('type' => 'uint', 'required' => true), 'note_message' => array('type' => 'string', 'required' => true), 'note_date' => array('type' => 'uint', 'default' => XenForo_Application::$time) ) ); } /** * Gets the actual existing data out of data that was passed in. See parent for explanation. * * @param mixed * * @return array|false */ protected function _getExistingData($data) { if (!$id = $this->_getExistingPrimaryKey($data, 'note_id')) { return false; } return array('xf_user_notes' => $this->_getProfileTabsModel()->getNoteById($id)); } /** * Gets SQL condition to update the existing record. * * @return string */ protected function _getUpdateCondition($tableName) { return 'note_id = ' . $this->_db->quote($this->getExisting('note_id')); } /** * @return newProfileTabs_Model_newProfileModel */ protected function _getProfileTabsModel() { return $this->getModelFromCache('newProfileTabs_Model_newProfileModel'); } } ?>
Save it.
We still can't test anything now, but will be a pleasure when we can. Everything will work.
Attachments
In this part we'll be making something more complex. We will be using more PHP code and go throug the XenForo's code.
So before we start, i really recomend you guys to use some IDE for programming in PHP. There is a tutorial made by Kier and you can see it HERE
So, your PHP EDITOR (or something) is ready? Let's go then.
Step 1 - Defining our mission
Remember in the previous tutorial that we put some new info in our content tab? We've used the Custom User Fields to make a field called "Favorite Band" and put in our content tab.
We also learn about conditionals and some other things.
Now, let's navigate throug the files of Xenforo so we can make what we want.
This tutorial will teach you how to put all likes that user gave to other users in his profile page, in our tab.
So all the tabs will make a group, like this:
Profile Page
---Profile Posts
---Recent Activity
---Postings
---Information
---Our Tab
This tutorial use some knowlogde of MVC structure, php code and other things.
Step 2 - How we will do that?
So, first of all, you have to know that not always we need to reinvent the wheel.
"I know, Fuhrmann, go to the point!".
Sure. What i am saying is maybe in some XenForo's files can exist a method that list all the user's likes that he gave. Dont you think? Yes. I always think this way. So the first thing i do, is looking for a method that already do what i want. So i dont need to make any calls to the database, i just have to use the right function.
In Xenforo structure (library/XenForo we have so many folders/files, see:

XenForo use the MVC structure:
Model: In this layer are defined rules of access and manipulation of data, which often stored in databases or files, but nothing indicates that serve accommodation only for persistent data. Can be used for data in volatile memory, eg RAM, although such use does not happen very often. All rules related to treatment, obtaining and validating data must be implemented in this layer.
View: This layer is responsible for generating the way the answer is displayed, web page, form, report, etc..
Controller: It is the layer responsible for responding to requests by the user. Whenever a user makes a request to the server layer is the first to be executed.
1. The user makes a request to the server.
2. The controller processes the user request.
3. The controller makes a call to the model, to retrieve or manipulate data.
4. The model returns the requested data will be passed to the view.
5. The view generates the presentation of data, eg an HTML page.
This explanation is just a resume. The purpose of the tutorial is not to get deeper in the MVC.
Well, lets see, in Model we have this:
...rules of access and manipulation of data...
So, this is what we want! A method that gonna call all user's likes that he gave with a query to the database. But, what doest that mean?
This mean something...
Look:
In the XenForo folder (library/XenForo) we have this structure:
--AdminSearchHandler
--AlertHandler
--AttachmentHandler
____OTHER FOLDERS____
--Importer
--Install
--LikeHandler
--Model
....
See? There is the model folder. All the model files are stored in there. So, thats a tip that our method should be in there. Go into the folder Model.
You will se a lot of more files and files. So confusing! But not to much. Think, we want a method that select all the user's likes. Let's look for some file called Like and see what we find.

Yes, there is a file called Like.php!
Open this file.
We see a bunch of methods and comments. That's good, will help us. So, looking for what we want, i found something:
PHP:/** * Gets likes based on the content user. * * @param integer $userId * @param array $fetchOptions Fetch options. Supports limit only now. * * @return array Format: [like id] => info */ public function getLikesForContentUser($userId, array $fetchOptions = array()) { $limitOptions = $this->prepareLimitFetchOptions($fetchOptions); return $this->fetchAllKeyed($this->limitQueryResults( ' SELECT liked_content.*, user.* FROM xf_liked_content AS liked_content INNER JOIN xf_user AS user ON (user.user_id = liked_content.like_user_id) WHERE liked_content.content_user_id = ? ORDER BY liked_content.like_date DESC ', $limitOptions['limit'], $limitOptions['offset'] ), 'like_id', $userId); }
But...no, wait! Oh, ********!
I think that's not what we want. See below, there is a example of the structure of the database table xf_liked_content that holds all the likes given:
like_idcontent_type = 1
content_id = post
like_user_id = 2
like_date= 1318342341
content_user_id = 1
like_user_id is the ID of the user who actually LIKED the content.
content_user_id is the ID of the user who actually RECEIVED the like.
We want to get all the likes were GIVEN by user_x. The method above, select all the likes of the user who received the likes. We want the givers.
(I just wanna make sure that's obvious other MANY ways to look files throug in XenForo. The way i teach, is the way i like, started. So, you can use your own way to find methods and other things inside the files of XenForo.)
Step 3 - the Model - Like
As we know, in the Model we "defined rules of access and manipulation of data, which often stored in databases or files". But if we want to create our own methods to manipulate data in XenForo? Customizable methods?
Well, then we have to extend the Model or create one for our add-on. In this case, we gonna create one.
Dont need to extend, because we wont use any parent method (Thanks to point me out ragtek!)
To do that, lets create the file that will be responsable for the model.
Remember the structure of folders and files we have so far? This:
library
-- newProfileTabs
----- Listener.php
Now let's create one more file, called newProfileModel.php, because we'll create a model for our addon with own method. I always follow a pattern of folders and filenames, so this is how i use and what you got if you follow my directions:
library
-- newProfileTabs
----- Model (new folder)
---------- newProfileModel.php (our new file!)
----- Listener.php
Open our new file (newProfileModel.php). We need to give it a class name. So, as always, we follow the directories structure. So our file newProfileModel.php will be:
PHP:<?php class newProfileTabs_Model_newProfileModel extends XenForo_Model { } ?>
We are extending to XenForo_Model because we are creating a Model. That way we can acess any other functions of the base class Model
We will know create our method to get the data from data base and return all we want: all the like that user gave.
So, our final version of file newProfileModel.php will be this:
PHP:<?php class newProfileTabs_Model_newProfileModel extends XenForo_Model { public function getAllGivenLikesByUser ($userId, $howMuch) { $db = $this->_getDb(); //Query the database with what we wat return $this->fetchAllKeyed(' SELECT liked_content.*, user.username as receive_username, post.* FROM xf_liked_content AS liked_content INNER JOIN xf_user AS user ON (user.user_id = liked_content.content_user_id) LEFT JOIN xf_post AS post ON (post.post_id = liked_content.content_id) WHERE liked_content.like_user_id = ? ORDER BY liked_content.like_date DESC ', 'like_id', $userId); } } ?>
I will not explain the SQL query, assuming that you already have a base of it.
So, there is our function. What this do?
- Select all fields from the xf_liked_content table WHERE the like_user_id field is equal what we pass throug the method.
- Also, select username field from xf_user table where the user_id field is equal to content_user_id field.
- Also select post.* for us to show the post of the user who received the like and some other fields.
Save, and let open. Now we will extend other file. The controlller.
Step 4 - The Controller Public - Member
Remember the exaplanation about controllers?
Controller: It is the layer responsible for responding to requests by the user. Whenever a user makes a request to the server layer is the first to be executed.
So, lets explain that.
What we want to do is:
-- Go to profile page (index.php?members/fuhrmann.1)
-- Click in our Tab (index.php?members/fuhrmann.1/#ourTab)
-- See all the likes that user_x gave.
As you know, we have used "members/fuhrmann.1/#ourTab" to access the content of our tab.
So:
controller (Route Prefix)/user_name.user_id/action
In this case "#ourTab" is not a action, because we did'nt define any action in the controller.
Don't know if you remember, but the content of our tab is (newProfileTab_ourTab_content):
Code:<li id="ourTab" class="profileContent"> <div class="section">This is our custom user field:</div> <dl class="pairsInline userField_favoriteBand"> <dt>{xen:helper userFieldTitle, favoriteBand}:</dt> <dd>{$user.customFields.favoriteBand}</dd> </dl> </li>
So, we load a custom user field. What we'll do know is define a action in the parent controller, and do what we want: show all user's like. We need to know what controller are we working and how we will use it. As i said, the controller we are using is "members".
We'll then extend the Controller "members". To find that, just go to the folder "ControllerPublic" located in \library\XenForo\ControllerPublic. There is a file Member.php. Open.
Are you seeing the actions?
- actionFollowing()
- actionFollowers()
- actionFollow()
- actionUnfollow() and others.
So, lets do a test, so we can understand. Replace the "{user_name}" with the name of the user you are seeing the profile.
Navigate to:
index.php?members/{user_name}/Following
index.php?members/{user_name}/Followers
index.php?members/{user_name}/Follow
index.php?members/{user_name}/Unfollow
BOLD - The action.
See the pattern here? All the actions i listed here, you can acces in the browser just navigating. But this not means all the actions are the same thing.
I think we got what we have to do, right?
This:
index.php?members/{user_name}/UsersLike
BOLD - Our new action, to do what we want. Get all the like that user_x gave.
So, what we know:
- File to extend - Members.php - Controller Public
-- Action to create - UsersLike - actionUsersLike()
Step 5 - Extending the Controller Public - Member
First, create the file follow the structure directories. We'll have this:
library
-- newProfileTabs
----- Extend
-------- ControllerPublic (our new folder)
------------ Member.php (our new file!)
------Model
-------- newProfileModel.php
----- Listener.php
Open Member.php and lets starting editing.
As i've told you, we'll extend the Controller Member. As normal, we make something like that:
PHP:<?php class newProfileTabs_Extend_ControllerPublic_Member { } ?>
Kier said:But for a dynamic system where there might be dozens of classes attempting to extend the like model, this is unworkable.
Instead, we must make use of the XenForo Class Proxy system, which allows the system to effectively have multiple inheritance capabilities. To use it, we must declare the class as ClassName, and have it extend XFCP_ClassName, like this:
PHP:<?php class newProfileTabs_Extend_ControllerPublic_Member extends XFCP_newProfileTabs_Extend_ControllerPublic_Member { } ?>
Ok. Now we have a new file, a new class extending..... it self?? Oh! Wait. As Kier explaining above, this is the XenForo Class Proxy system (XFCP), that "allows the system to effectively have multiple inheritance capabilities", so dont worry.
- File to extend - Members.php - Controller Public --- DONE!
-- Action to create UsersLike - actionUsersLike() -- WILL DO NOW
Now, let's create our action:
PHP:<?php class newProfileTabs_Extend_ControllerPublic_Member extends XFCP_newProfileTabs_Extend_ControllerPublic_Member { //See? actionNameOfOurAction public function actionUsersLike() { //Lets get the userID $userId = $this->_input->filterSingle('user_id', XenForo_Input::UINT); $user = $this->getHelper('UserProfile')->assertUserProfileValidAndViewable($userId); //Lets get all the likes that this user gave to anothers //We are using our function here and our model! getAllGivenLikesByUser() $users_likes = $this->getModelFromCache('newProfileTabs_Model_newProfileModel')->getAllGivenLikesByUser($userId, '10'); //Returning all the values to our template newProfileTab_ourTab_content //With the variable $users_likes, and the variable $user. return $this->responseView( 'newProfileTab_ViewPublic_Member_UsersLike', 'newProfileTab_ourTab_content', array('user' => $user, 'users_likes' => $users_likes) ); } } ?>
Its done. But we dont know if it works. And i can say, dont work.
There is more things to do.
Remember the Code Event Listeners? Yeah. We need to create them so our extending classes get to work.
Step 6 - Code Event Listeners
I already made a tutorial explaning how Code Event Listeners works, so i am not going to explain this time. But it's not to dificult.
- Create a new Event Listener.
- In Listen to Event chose load_class_controller (we have extended the Controller Member, remember?)
- In Execute Callback do not fill yet.
- Chose the Add-on "New Profile Tabs".
Now, BEFORE saving it.
Open your file Listener.php and add the following code:
PHP:public static function load_controller ($class, array &$extend) { //We extend this, remember? The member controller. if ($class == 'XenForo_ControllerPublic_Member') { //We created this class, remember? So that goes here. $extend[] = 'newProfileTabs_Extend_ControllerPublic_Member'; } }
Get back to the page of Code Event Listeners and fill with this:
Execute Callback: First field is the name of the class of our listener (Listener.php) which is newProfileTabs_Listener. The second field is the name of our method that we created right now, that is: load_controller.
Hit Save Event Listener.
All required Event Listeners to work with our add-on is done. Next Step.
Step 7 - Changing our template content
We have made the core until now.
Created the method to get all the likes that user_X gave and get the array as return.
We can now use all the parameters that our method grabs it on ournewProfileTab_ourTab_content.
So, open the template newProfileTab_ourTab_content. This is what you got:
Code:<li id="ourTab" class="profileContent"> <div class="section">This is our custom user field:</div> <dl class="pairsInline userField_favoriteBand"> <dt>{xen:helper userFieldTitle, favoriteBand}:</dt> <dd>{$user.customFields.favoriteBand}</dd> </dl> </li>
We will now change all the code to fit our necessities. So, what we want to show in here? A phrase? A name. Let's define.
As we know, we are able to use rows from three table: xf_post, xf_user and xf_liked_content.
This is what will be our final version of the template:

So, still with the template newProfileTab_ourTab_content open, lets replace all the code for this:
Code:<xen:require css="search_results.css" /> <li id="ourTab" class="profileContent" data-loadUrl="{xen:link members/userslike, $user}"> <xen:if is="{$users_likes}"> <xen:foreach loop="$users_likes" value="$like"> <ol> <li class="searchResult post primaryContent"> <div class="listBlock main"> <div class="titleText"> <h3 class="title"><a href="posts/{$like.post_id}/">{$user.username} liked the post of {$like.receive_username}:</a></h3> </div> <blockquote class="snippet"> {xen:helper snippet, $like.message, 150} </blockquote> <div class="meta"> Post by: <xen:username user="{$like}" rich="true" />, Liked in <xen:datetime time="{$liked_content.like_date}" /> </div> </div> </li> </ol> </xen:foreach> <xen:else /> <p>This user not liked any content yet.</p> </xen:if> </li>
Explanation:
The data-LoadUrl is used to load when we need to load more then a simple content. So we are using!Code:<li id="ourTab" class="profileContent" data-loadUrl="{xen:link members/userslike, $user}">
Code:<xen:require css="search_results.css" />
This is the CSS used to display search results. Since this is a tutorial on how to make a simple addon, i just grab a css and put here to make some style in our result. But for sure, you can develop your own style of display.
Code:<xen:if is="{$users_likes}">
Code:<xen:else /> <p>This user not liked any content yet.</p> </xen:if>
Is the user really have give some like in content until now, we will show it. If not, we will show that message above.
[CODE[<xen:foreach loop="$users_likes" value="$like">[/CODE]
Since we are getting more then one row from the database, its usual that returns me a array. So we use a "xen:foreach" to loop throug the values and print them.
Code:<h3 class="title"><a href="posts/{$like.post_id}/">{$user.username} liked the post of {$like.receive_username}:</a></h3>
$user is the own of the profile page. $like.receive_username is the user who RECEIVES the like. How i selected this field? Here, in the Member Controller that we created together:
Code:SELECT liked_content.*, user.username as receive_username,
Code:{xen:helper snippet, $like.message, 150}
Here we are using the xen helper. I will not teach anything about it, but i have to say that's very usefull. Here i just call the helper, pass the post message to the helper and how many caracters i want to show. Its a snippet.
Code:Post by: <xen:username user="{$like}" rich="true" />,
With this we can show the user name with a link. Its simple. Just pass a array and select if you want rich or not.
Code:Liked in <xen:datetime time="{$liked_content.like_date}" />
And, this is the time. When we get them from the database is is another format (1318262027), but with the xen:datetime, we got it with a readable human time.
So thats it.

Learn more about conditionals in here: http://xenforo.com/community/threads/frequently-asked-questions.5183/#post-182355
You have to read the first part to understand the second.
Some codes of this tutorial I have taken of this addon on. (BTW, its a great addon, i always use)
http://xenforo.com/community/threads/product-xenfans-com-extra-debug.19504/
--------
Ok, so what's up now?
Since we finished our first tutorial we now have a simple tab heading and his simple content. But what if we want to use some parameters, like User ID, User Name, Group Name or even permissions?
Ok, lets learn!
Step 1 - Using parameters in the tab content - Discovering
Remember our two templates?
Here it is:
newProfileTab_ourTab (show the tab link)
newProfileTab_ourTab_content (show the tab content)
There is the code of the newProfileTab_ourTab_content to remember you:
Code:<li id="ourTab" class="profileContent"> <div class="section">This is the content of our tab</div> </li>
The content just print a simple phrase "This is the content of our tab". But, we want more, dont? This is so simple! Lets make a test? We are talking about parameters. Since we are in the profile page, its obvious (or not?) that we have some parameters available for use.
BUT then you ask: "How i am supossed to know this parameters?"
Well, let me show you.
Open the template newProfileTab_ourTab_content and add this code:
(this code was taken of the Floris addon, Extra Debug)Code:{xen:helper dump, $visitor}
This code will show you all parameters of the "$visitor" that are available for use. But only the parameters for the $visitor (us or anyone visiting something in your forum)
So your code wil be:
Code:<li id="ourTab" class="profileContent"> <div class="section">This is the content of our tab</div> {xen:helper dump, $visitor} </li>
Save it.
Go to any profile page of your forum and click in our tab. ("Our Tab")
What are you seeing?
This:

What....?! We have about 70 parameters we can use with the $visitor variable? Wow! That's cool. I will not paste all the parameters here, but i think you can see them all in there.
So it is:
Code:-$visitor ----parameter 1 ----parameter 2 ----parameter 3 ----parameter 4 ------parameter 1 ------parameter 2 ------parameter 3 ----parameter 5
And to use, just put the $visitor in front the parameter.
Code:{$visitor.parameter1} {$visitor.parameter2} {$visitor.parameter3}
This also serves to the $user variable.
$visitor -> Who is accessing the profile page.
$user -> The user who OWN the profile page.
Some example:
Fuhrmann is visiting the profile page of Floris.
Fuhrmann -> $visitor
Floris-> $user
So, lets do something really good?
Step 2 - Explaining what we will do (do something really good)
"Ok, now i understand! I can use this parameters to customize the content of my tab!"
Exactly. We are in this together. Lets make a little modification in our two templates. Remember the list of parameters? I took this: "user_group_id".
What do we do now? We will only allow access to our tab to:
---- only users who are moderators.
---- only user who are administrators.
---- the user who own tab
---- deny to all guests.
For this, we need to know wich one is the user group ID of each group.
You know how?
Ok, i will teach anyway.
Step 3 - Discovering ID
Go to AdminCP>Users>List User Groups.
You will see this:

Each user group has a link and a ID. Put the mouse over the "Administrative" group.
You will see the link.

(this is the link for my localhost test board, your link maybe be diferent)
This link tells more that we think. Let's see:
http://localhost/xen/admin.php?user-groups/administrative.3/edit
RED -> This is where we are. The user groups manager.
BLUE - > Name of the group to manage.
GREEN -> And there is! The USER GROUP ID! Oh! That was not to dificult.
"Ok, i have the ID, so what now?"
Now, you will write down the others user group ID.
Administrative ID: 3
Moderating ID: 4
Step 4 - Using conditionals with parameters
Ok, since we want to allow access to only some usergroup we will need to use conditionals mixed with parameters.
Here is a generic conditional exemple used in templates:
There is another:Code:<xen:if is="SOMETHING"> DO STUFF </xen:if>
Now we know the basics lets use! Remember our parameters? That one we took from the 70 parameters? Dont?Code:<xen:if is="SOMETHING == SOMEONE"> DO STUFF <xen:else /> DO OTHER STUFF </xen:if>
Here is:
$visitor.user_group_id (show the group id of the visitor)
Or you can use this too:
$user.user_group_id (show the group id of the user, the one who owns the profile page)
Open the template newProfileTab_ourTab and put this code replacing the old one:
Save it.Code:<xen:if is="{$visitor.user_group_id} == '3' OR {$visitor.user_group_id} == '4' OR {$visitor.user_id} == {$user.user_id}"> <li><a href="{$requestPaths.requestUri}#ourTab">Our Tab</a></li> </xen:if>
Explaining:
IF (VISITOR IS GROUP ADMINISTRATIVE) OR (VISITOR IS GROUP MODERATING) OR (VISITOR ID EQUALS USER ID WHO OWN THE PAGE)
CAN SEE TAB LINK
END IF
See what we've done? Only Administrative, moderating and the own user of the profile page can see the tab link.
Lets test?
Step 5 - Testing the conditionals
You will have to make sure you have more then once user. Maybe you can make about 3 users.
User 1 - User Group: Administrative
User 2 - User Group: Moderating
User 3 - User Group: Registered and owns the tab
Guest - Do nothing, just to show to you.
Log into the account of User1 and see the tab. You are able to see.
Log into the account of User2 and see the tab. You are able to see.
Log into the account of User3 and see the tab. You are able to see.
Logout and stay as guest. Can you see the tab? No!
So, even if you arent administrative ou moderating, but you own the profile, you can see.
Job done? Yes!
This is a way to do the conditionals. But you can do a lot better conditional using this post:
http://xenforo.com/community/threads/frequently-asked-questions.5183/#post-182355
There are some other examples you can use in conditionals. Remember we have about 70 parameters to use with $visitor and $user?
1. Same conditional as above, but using another way to verify:
Code:<xen:if is="{xen:helper ismemberof, $visitor, 3} OR {xen:helper ismemberof, $visitor, 4} OR {$visitor.user_id} == {$user.user_id}"> <li><a href="{$requestPaths.requestUri}#ourTab">Our Tab</a></li> </xen:if>
1.1 Same conditional as above, but using another way to verify:
Code:<xen:if is="{$visitor.is_admin} OR {$visitor.is_moderator} OR {$visitor.user_id} == {$user.user_id}"> <li><a href="{$requestPaths.requestUri}#ourTab">Our Tab</a></li> </xen:if>
2. Conditional using the parameter user_id, verifying if the $visitor is logged or just a guest. Dont show for guest.
Code:<xen:if is="{$visitor.user_id}"> <li><a href="{$requestPaths.requestUri}#ourTab">Our Tab</a></li> </xen:if>
Step 6 - Do what?
Now we have a little base on how to use parameters. We know we can make conditionals, can use some parameters to limit certains user groups to view and etc.
We need now to put something in the content of our tab (newProfileTab_ourTab_content). Remember? We only have this for now:
Code:<li id="ourTab" class="profileContent"> <div class="section">This is the content of our tab</div> </li>
What if we could put some custom values from custom user fields?
So, lets do it.
Step 7 - Creating a Custom User Field (with screenshots!)
Custom User Fields are used to display custom user data. You can put any information in there. We will be creating a custom user field that display the user's favorite band. First of all: go to your AdminCP>Users>Custom User Fields. You will see a list of pre made user fields that comes with XenForo. What about we create one just for us?
Hit the button "Create New Field".

We have 3 tabs.
Basic Information (please, fill as below)
Field ID: As show in the form: "This is the unique identifier for this field. It cannot be changed once set.". So set this as favoriteBand.
Title: The title will appear before the information of this field. Lets put "Favorite Band".
Example:
Favorite Band: [CUSTOM INFORMATION HERE]
Description: A simple description of the field. Let's put "User's favorite band".
Display Location: Where this field should be placed so user can fill? Well, let's chose "Personal Details".
Display Order: Let this value in 1.
Options for Text Fields (please, fill as below)
Field Type: Single-line text box. This options tells for itself.
Value Match Requirements: Lets not limit the user input. Check "None".
PHP Callback: Only if we had a method to use it as CallBack (remember the first tutorial? Callbacks, listeners..) leave this as is.
Maximum Length: Lets put into 50.
General Options (please, fill as below)
Field is required: Only if this field is required. In this case, does not check.
Show during registration: For now, this does not matter.
User editable: User can edit this field. Yes. Checked.
--Editable only once: No! We want allow the user to change more then once.
Viewable on profile pages: DONT check. We wanna put this manually in our own tab!
Viewable in message user info: Does not matter now. Leave unchecked.
Value Display HTML: Only if you want to show your custom user field in some kinda of a different HTML then is showed. Example, a image. For now, leave as it is.
Hit "Save Field". Ok, we have our Custom User Field!
Lets fill the custom field now. Go to your Personal Details, and you will got this:

Just put some information you want and save.
Step 8 - Put the custom user field in the content tab! (its about time!)
Now we have this custom user field, we can place it in somewhere. Lets use our templatenewProfileTab_ourTab_content.
Open the template newProfileTab_ourTab_content and put the folowing code replacing all existing:
Code:<li id="ourTab" class="profileContent"> <div class="section">This is our custom user field:</div> <dl class="pairsInline userField_favoriteBand"> <dt>{xen:helper userFieldTitle, favoriteBand}:</dt> <dd>{$user.customFields.favoriteBand}</dd> </dl> </li>
So:
{xen:helper userFieldTitle, favoriteBand}
RED: This is what we want to show. The title. "Favorite Band". We made it in Step 7.
BLUE: This is the unique ID of our custom user field.
Remember our parameters?
Well, we are using them.
See:
{$user.customFields.favoriteBand}
$user-> user who own the profile page
$customFields -> all of your custom fields
favoriteBand -> our custom field that we created, remember?
So, you can use any conditionals in our two templates, to limit, deny, acces to any usergroup, or anyuser.