Fuhrmann
Well-known member
Creating a add-on to insert tabs in profile page (using hooks) (PART 1)
Creating a add-on to insert tabs in profile page (using hooks) (PART 2)
Creating a add-on to insert tabs in profile page (using hooks) (PART 3)
Hey guys! DaveL just give me some tips about the next tutorial:
So, let's do it!
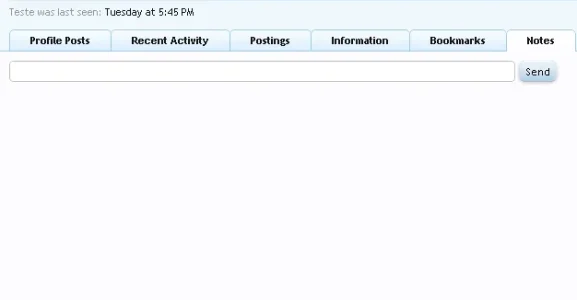
So, in this tutorial we gonna change the content of our tab . No more "user's like". Our tab will have now a input text, which only admin/moderators can see, and write down some notes about the user. We'll call our tab "Notes".
Step 1 - Where to save the content?
Let's see: We now will have a tab that hold some notes about some user. Looking this way, we know we'll have some place to save this notes. But where?
Yes, in database. You can define the fields and which way you prefer to create it, but we will following this:
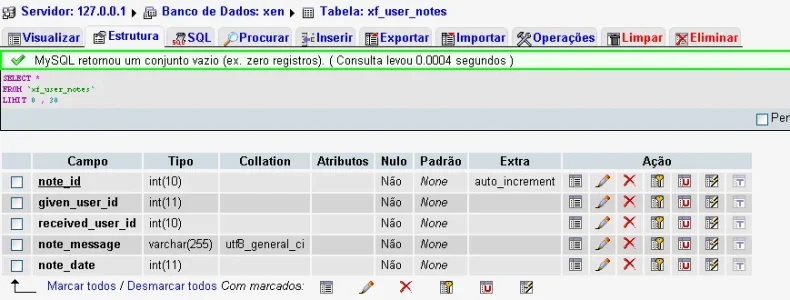
Table: xf_user_notes
Fields:
note_id -> Auto-increment field, this is the id of every note;INT (10)
given_user_id -> The user who is giving the note;INT (10)
received_user_id -> The user who is receiving the note;INT (10)
note_message-> The message of the note;VARCHAR (255)
note_date-> When the note was given to the received_user_id;INT(10)
Now we know how our new database will look like, we need to create it.
Step 2 - Explaining the Installer
Knowing that now we'll use a database, we need to a installer. So what this mean? Mean that the installer will create our database every time someone install our addon.
- User download our add-on
- User install our add-on
- Installer create all the databases our add-on needs
- User start to use the add-on.
- User want to uninstall our add-on
- Installer has a function called "uninstall" so the created tables will drop since the user dont need them anymore.
- Fin.
See? The installer has two basics methods: Install and Uninstall.
Inside the Installer we will declare all database structure we want to create. Let's do it.
Step 3 - Creating the installer
This is what we have so far in our directories structure:
- newProfileTabs
---- Extend
------- ControllerPublic
----------- Member.php
---- Model
------- newProfileModel.php
---- Listener.php
Go to the folder of our add-on "newProfileTabs" and create a new file. Name it as "Installer.php". So, this is what we'll have:
- newProfileTabs
---- Extend
------- ControllerPublic
----------- Member.php
---- Model
------- newProfileModel.php
---- Installer.php (our new file!)
---- Listener.php
"What's next? How i suposed to know what i have to write in this file?"
You may ask. Well, remember in the last tutorial (PART 3) we looking inside the files of XenForo? So, lets do the same! Since XenForo has installed in your computer (or website) we know that XenForo have a installer too! What about we take a look at it, so we can grab some code and make our own installer?
Looking inside the folder library/Xenforo we see a folder:
Install
Open it. We know got more and more folder and files. Each folder: more files. Well, the best way is looking to one by one file and see if we got what we want, some file which has declarations of database structure...
..... (looking inside the files)......
WAIT! GOTCHA! We found! I found it, i found it!
Open the Data folder, it is in library/XenForo/Install/Data. Check the file MySql.php:
I think we got luck, eh?
Now we have a example code, we can make our code. Open the Installer.php. First, as always we need to put a name in our file class. Let's do it:
Now, the query for the installer create our table. Since we got a example, that's not to dificult to make our own query:
Note that we have a array $table. Inside we have 'createQuery' and 'dropQuery'. We gonna execute each one for the install() and uninstall() methods respectively.
So, let's create our install method:
That's it. We have our install function. Easy eh? How do you guess that we be our uninstall function? That's pretty more easy and almost the same:
See? We just changed the 'createQuery' to 'dropQuery'!
Our installer is finished:
Creating a add-on to insert tabs in profile page (using hooks) (PART 2)
Creating a add-on to insert tabs in profile page (using hooks) (PART 3)
Hey guys! DaveL just give me some tips about the next tutorial:
Also, I dont know if you planned to create any more tutorials, but another interesting one based on the profile tab with the permissions you went through would be a "member notes" kind of add on.
Usergroups with permissions (admins/mods) can only see the tab on users profiles. Each tab has a text input box similar to that of the "profile posts" tab. Admins/Mods could then post a note which would only show to other Admins/Mods underneath the input box.
So, let's do it!
So, in this tutorial we gonna change the content of our tab . No more "user's like". Our tab will have now a input text, which only admin/moderators can see, and write down some notes about the user. We'll call our tab "Notes".
Step 1 - Where to save the content?
Let's see: We now will have a tab that hold some notes about some user. Looking this way, we know we'll have some place to save this notes. But where?
Yes, in database. You can define the fields and which way you prefer to create it, but we will following this:
Table: xf_user_notes
Fields:
note_id -> Auto-increment field, this is the id of every note;INT (10)
given_user_id -> The user who is giving the note;INT (10)
received_user_id -> The user who is receiving the note;INT (10)
note_message-> The message of the note;VARCHAR (255)
note_date-> When the note was given to the received_user_id;INT(10)
Now we know how our new database will look like, we need to create it.
Step 2 - Explaining the Installer
Knowing that now we'll use a database, we need to a installer. So what this mean? Mean that the installer will create our database every time someone install our addon.
- User download our add-on
- User install our add-on
- Installer create all the databases our add-on needs
- User start to use the add-on.
- User want to uninstall our add-on
- Installer has a function called "uninstall" so the created tables will drop since the user dont need them anymore.
- Fin.
See? The installer has two basics methods: Install and Uninstall.
Inside the Installer we will declare all database structure we want to create. Let's do it.
Step 3 - Creating the installer
This is what we have so far in our directories structure:
- newProfileTabs
---- Extend
------- ControllerPublic
----------- Member.php
---- Model
------- newProfileModel.php
---- Listener.php
Go to the folder of our add-on "newProfileTabs" and create a new file. Name it as "Installer.php". So, this is what we'll have:
- newProfileTabs
---- Extend
------- ControllerPublic
----------- Member.php
---- Model
------- newProfileModel.php
---- Installer.php (our new file!)
---- Listener.php
"What's next? How i suposed to know what i have to write in this file?"
You may ask. Well, remember in the last tutorial (PART 3) we looking inside the files of XenForo? So, lets do the same! Since XenForo has installed in your computer (or website) we know that XenForo have a installer too! What about we take a look at it, so we can grab some code and make our own installer?
Looking inside the folder library/Xenforo we see a folder:
Install
Open it. We know got more and more folder and files. Each folder: more files. Well, the best way is looking to one by one file and see if we got what we want, some file which has declarations of database structure...
..... (looking inside the files)......
WAIT! GOTCHA! We found! I found it, i found it!
Open the Data folder, it is in library/XenForo/Install/Data. Check the file MySql.php:
PHP:
$tables = array();

$tables['xf_addon'] = "
    CREATE TABLE xf_addon (
        addon_id VARCHAR(25) NOT NULL,
        title VARCHAR(75) NOT NULL,
        version_string VARCHAR(30) NOT NULL DEFAULT '',
        version_id INT UNSIGNED NOT NULL DEFAULT 0,
        url VARCHAR(100) NOT NULL,
        install_callback_class VARCHAR(75) NOT NULL DEFAULT '',
        install_callback_method VARCHAR(75) NOT NULL DEFAULT '',
        uninstall_callback_class VARCHAR(75) NOT NULL DEFAULT '',
        uninstall_callback_method VARCHAR(75) NOT NULL DEFAULT '',
        active TINYINT UNSIGNED NOT NULL,
        PRIMARY KEY (addon_id),
        KEY title (title)
    ) ENGINE = InnoDB CHARACTER SET utf8 COLLATE utf8_general_ci
";
I think we got luck, eh?
Now we have a example code, we can make our code. Open the Installer.php. First, as always we need to put a name in our file class. Let's do it:
PHP:
// folder/file
// Following the directories structure
class newProfileTabs_Installer
{

}
Now, the query for the installer create our table. Since we got a example, that's not to dificult to make our own query:
PHP:
protected static $table = array(
        'createQuery' => 'CREATE TABLE IF NOT EXISTS `xf_user_notes` (
            `note_id` int(10) NOT NULL AUTO_INCREMENT,
            `given_user_id` int(10) NOT NULL,
            `received_user_id` int(10) NOT NULL,
            `note_message` VARCHAR(255) NOT NULL,
            `note_date` int(11) NOT NULL,
              PRIMARY KEY (`note_id`)
        ) ENGINE = InnoDB CHARACTER SET utf8 COLLATE utf8_general_ci;',
        'dropQuery' => 'DROP TABLE IF EXISTS `xf_user_notes`'
    );
Note that we have a array $table. Inside we have 'createQuery' and 'dropQuery'. We gonna execute each one for the install() and uninstall() methods respectively.
So, let's create our install method:
PHP:
//Create the database
public static function install() {
    //We get here the instance of the XenForo db
    $db = XenForo_Application::get('db');

    //Tell the db to query our 'createQuery', remember?
    $db->query(self::$table['createQuery']);
}
That's it. We have our install function. Easy eh? How do you guess that we be our uninstall function? That's pretty more easy and almost the same:
PHP:
//Drop the database
public static function uninstall() {
    //We get here the instance of the XenForo db
    $db = XenForo_Application::get('db');

    //Tell the db to query our 'dropQuery', because we are uninstalling.
    $db->query(self::$table['dropQuery']);
}
See? We just changed the 'createQuery' to 'dropQuery'!
Our installer is finished:
PHP:
<?php// folder/file
// Following the directories structure
class newProfileTabs_Installer
{

    protected static $table = array(
        'createQuery' => 'CREATE TABLE IF NOT EXISTS `xf_user_notes` (
            `note_id` int(10) NOT NULL AUTO_INCREMENT,
            `given_user_id` int(10) NOT NULL,
            `received_user_id` int(10) NOT NULL,
            `note_message` VARCHAR(255) NOT NULL,
            `note_date` int(11) NOT NULL,
              PRIMARY KEY (`note_id`)
        ) ENGINE = InnoDB CHARACTER SET utf8 COLLATE utf8_general_ci;',
        'dropQuery' => 'DROP TABLE IF EXISTS `xf_user_notes`'
    );

    //Create the database
    public static function install()
    {
        //We get here the instance of the XenForo db
        $db = XenForo_Application::get('db');

        //Tell the db to query our 'createQuery', remember?
        $db->query(self::$table['createQuery']);
    }

    //Drop the database
    public static function uninstall()
    {
        //We get here the instance of the XenForo db
        $db = XenForo_Application::get('db');

        //Tell the db to query our 'dropQuery', because we are uinstalling.
        $db->query(self::$table['dropQuery']);
    }

}
?>
