How To Install Elasticsearch 7.x for Xenforo on CentOS

Sunka

Well-known member
How To Install Elasticsearch 7.x for Xenforo


This is tutorial for installing (not upgrading) elasticsearch 7 on centos.
If I am missing something, please post here.

Delete first old one if you have installed and install fresh new one elasticsearch v7
Code:
yum remove elasticsearch

Installing elasticsearch 7

Code:
rpm --import https://artifacts.elastic.co/GPG-KEY-elasticsearch
Code:
nano /etc/yum.repos.d/elasticsearch.repo
insert this:
Code:
[elasticsearch]
name=Elasticsearch repository for 7.x packages
baseurl=https://artifacts.elastic.co/packages/7.x/yum
gpgcheck=1
gpgkey=https://artifacts.elastic.co/GPG-KEY-elasticsearch
enabled=1
autorefresh=1
type=rpm-md
If you do not have java installed, install it (elasticsearch itself includes a bundled version of OpenJDK, but, just to be sure).
Java v11 is what you want to install. You can have both version (v.8 and v.11) but I removed v8 and installed v11
Code:
yum remove java-1.8.0-openjdk
Code:
yum -y install java-11-openjdk

Code:
yum install --enablerepo=elasticsearch elasticsearch
Code:
nano /etc/elasticsearch/elasticsearch.yml
at the end of file add this:
Code:
cluster.name: CUSTOM NAME OF YOUR CLUSTER (same name "should" be inserted into your XenForo field in Admin Control Panel in field Elasticsearch Index Name)
network.host: localhost
http.port: 9200
node.name: ANOTHER CUSTOM NAME
cluster.initial_master_nodes: ANOTHER CUSTOM NAME (same as line above, and use all lowercase)

Also, in same above template change/modify the path -Djava.io.tmpdir=
Code:
-Djava.io.tmpdir=/home/elasticsearch

Then (thanks @rdan )
Code:
mkdir /home/elasticsearch

and

Code:
chown -R elasticsearch:elasticsearch /home/elasticsearch/


set how much ram you will add for elasticsearch - 512 megabytes is set in example (both Xms and Xmx must have same value)
Code:
nano /etc/elasticsearch/jvm.options
Code:
-Xms512m
-Xmx512m


Code:
service elasticsearch start
Code:
systemctl daemon-reload
Code:
systemctl enable elasticsearch.service
Code:
systemctl start elasticsearch.service

test if everything OK (give 1-2 minute after restarting elasticsearch)
Code:
curl -XGET 'localhost:9200'
If everything OK, you will see something like this in your CLI
Code:
# curl -XGET 'localhost:9200'
{
  "name" : "xxxx",
  "cluster_name" : "xxxxx",
  "cluster_uuid" : "4nAffvfpSGG-RE4ou1ttFA",
  "version" : {
    "number" : "7.6.0",
    "build_flavor" : "default",
    "build_type" : "rpm",
    "build_hash" : "7f634e9f44834fbc12724506cc1da681b0c3b1e3",
    "build_date" : "2020-02-06T00:09:00.449973Z",
    "build_snapshot" : false,
    "lucene_version" : "8.4.0",
    "minimum_wire_compatibility_version" : "6.8.0",
    "minimum_index_compatibility_version" : "6.0.0-beta1"
  },
  "tagline" : "You Know, for Search"
}

Also, just in case run command and choose Java 11 (if it will list more than 1 java version):
Code:
alternatives --config java

Also, it is better that you not use shard replica if Elasticsearch is on same server.
So for make by default no replica shards, run this command

Code:
curl -XPUT "localhost:9200/_template/all" -H'Content-Type: application/json' -d'
{
  "template": "*",
  "settings": {
    "number_of_replicas": 0,
    "number_of_shards": 1
  }
}
'

To see if you have unassigned replica shards run:

Code:
curl -s -XGET http://localhost:9200/_cat/shards | fgrep UNASSIGNED

To delete unassigned replica shards run:

Code:
curl -XGET http://localhost:9200/_cat/shards | grep UNASSIGNED | awk {'print $1'} | xargs -i curl -XDELETE "http://localhost:9200/{}"

Then deleted the index. After that go to ElasticSearch Setup in Xenforo ACP then rebuilt the index without deleting.

Minimum version of XenForo Enhanced Search you have installed for elasticsearch 7 is 2.0 I think!

After you installed elastic search, configure relevant options for enhanced search in your Xenforo ACP and rebuild index (all).
It is better and faster to rebuild index through cli. So:

Trunucate old index first (if you have it):
Code:
cd /PATH/TO/YOUR/XENFERO/INSTALL/public/

// SOMETHING LIKE: cd /home/nginx/domains/your_domain.com/public/
and then

Rebuild search with trunucating index before that
Code:
php cmd.php xf-rebuild:search --truncate
or just rebuild without trunucating index
Code:
php cmd.php xf-rebuild:search

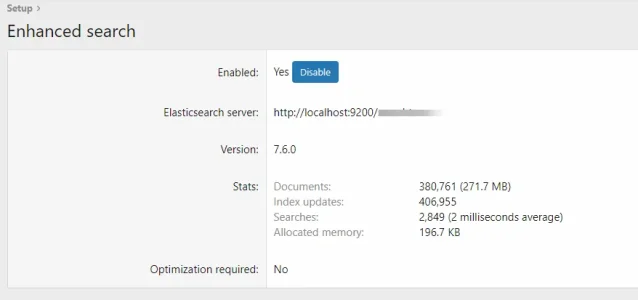
And how it looks in elasticsearch setup page in xenforo ACP
setup.webp
 
There are some confusing instructions above that require some clarification:

You wrote:
Also, in same above template change/modify the path -Djava.io.tmpdir=

Code:
-Djava.io.tmpdir=/home/elasticsearch
The instruction is written above as if that variable is in the elasticsearch.yml file. It is in the jvm.options file and that is where the change needs to be made.
 
Last edited:
@Brogan @Chris D
Could some of you edit my first post and change line
Also, in same above template change/modify the path [I]-Djava.io.tmpdir=[/I]

to this

Also, in template [B][I]/etc/elasticsearch/jvm.options[/I][/B] change/modify the path [I]-Djava.io.tmpdir=[/I]

Thank you
 
great guide thank you.

in order to get this to run on Centos 7/Apache you have to add the following to the jvm options file:

Code:
-Xms512m
-Xmx512m
-Djava.io.tmpdir=/home/elasticsearch
-Djna.tmpdir=/home/elasticsearch
 
Thank you, i just install this, but not to web localhost i have install to new an root server and i have config nano /etc/elasticsearch/elasticsearch.yml like this on the part of network...

Code:
# ---------------------------------- Network -----------------------------------
#
# Set the bind address to a specific IP (IPv4 or IPv6):
#
network.host: 127.0.0.1
http.host: 0.0.0.0
#
# Set a custom port for HTTP:
#
http.port: 9200
#
# For more information, consult the network module documentation.

After this you can use https://ip:9200
 
I was following the steps in this great tutorial but was caught off guard with the message after "yum install --enablerepo=elasticsearch elasticsearch"
error getting repository data for elasticsearch, repository not found.

I used putty to log in to the root directory of my server and was keying in the cli commands from there. Does it matter what the current working directory is when doing this?
 
Follw up. In order to follow the insturctions, I copied the instructions into by terminal buffer and made a text document I could print to read.

Apparently I typed some key combination that inserted the insturctions above as commands into the cli in my putty session. That probably messed things up pretty badly, so I am now going to start over. :(
 
I was following the steps in this great tutorial but was caught off guard with the message after "yum install --enablerepo=elasticsearch elasticsearch"
error getting repository data for elasticsearch, repository not found.

I used putty to log in to the root directory of my server and was keying in the cli commands from there. Does it matter what the current working directory is when doing this?
you can use onother method installation...

Code:
wget https://artifacts.elastic.co/downloads/elasticsearch/elasticsearch-7.10.0-x86_64.rpm
wget https://artifacts.elastic.co/downloads/elasticsearch/elasticsearch-7.10.0-x86_64.rpm.sha512
shasum -a 512 -c elasticsearch-7.10.0-x86_64.rpm.sha512
sudo rpm --install elasticsearch-7.10.0-x86_64.rpm
 
Thank you so much. I have installed Elasticsearch and reinstalled XFES. It has been rebuilding my index for the past 5 hours with no apparent problem.

Just a tiny bit off topic, since I log in to the site as root on those rare occasions when I go CLI, I did not use the sudo when trying to follow the previous instructions. I thought that all sudo did was give me root privileges. However, after all the trauma of the last week, I was extra cautious and used sudo as in the example that completed successfully.

Was I naïve in my assumption that sudo is not needed for the root account? If that was indeed my problem, I have learned two valuable lessons in this exercise.
 
  • Haha
Reactions: WxP
My Elasticsearch has disappeared again and I tried to repeat the process above that worked so well for me before. However, this time the second wget with the .sha512 at the end is timing out and never completes.

Has there been some change since last November that makes the instructions invalid?
 
Back
Top Bottom