Fuhrmann
Well-known member
This tutorial will teach you how to insert new tabs in the profile page using the templates hooks. You can see a more detailed explanation here: http://xenforo.com/community/threads/how-to-use-template-hooks.13167/
Step 1 - First of all
You have to make sure that your XenForo is in debug mode. To do this, open your config.php (yourForum/library/config.php) and put this line into:
Save it. Close. Go to your AdminCP and you'll see a new tab. "Development".
Step 2 - The Add-on
Log into your AdminCP go to Development>Create Add-on
Lets fill the fields with this information:
Add-on ID: newProfileTabs
Title: New Profile Tabs in profile page
Version String: 1.0
Version ID: 1
Save it.
Step 3 - The template hook
This Add-on will use the template hooks system, so the new tabs always remained active even after an upgrade of XenForo.
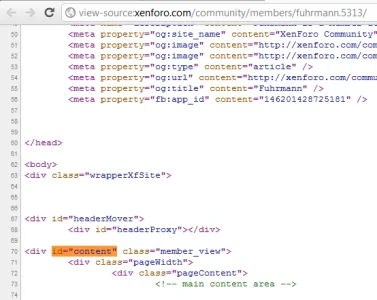
First of all let's find the template of the profile page. There is so many ways to do that, here is what i do:
In my browser (Chrome), I go to the profile page and inspect it (F12) . I'm looking for some class that i can use to search in the "Search Template" AdminCP.
Let's see:
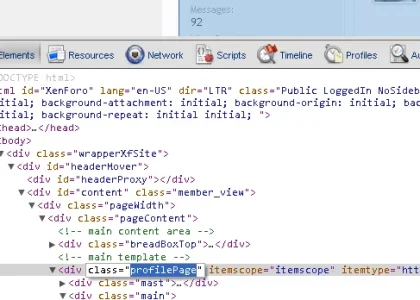
Appears that we can use the class "profilePage" for the search. Ok, go to your AdminCP>Appearence>Search Templates and search for.
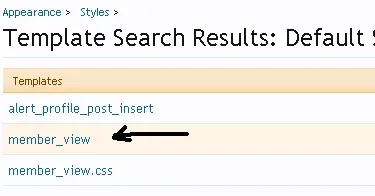
Well, We got it! The template is "member_view".
If you look inside the template, you'll find:
That's what we were looking for! This code makes the current tabs, and there is the template hook. So far, we now the template name that make the tabs. Now we know too the name of the template hook! See this line:
This is the hook name: "member_view_tabs_heading". Write down somewhere, we will use it.
Step 4 - Creating the files for the add-on
We need those files to make all works. Go to yourForum/library/
Our add-on structure will be like this:
yourForum
--library
----newProfileTabs
------Listener.php
Make sure you follow this structure, so this tutorial will work for you. Inside the folder "newProfileTabs" create a file called "Listener.php" and leave it there.
Step 5 - The Code Event Listeners
We can now create a new Code Event Listener and put this template hook into work. Let's see how.
Go to your AdminCP>Development>Code Event Listeners. Click in the button "+Create New Code Event Listener".
You'll see this:
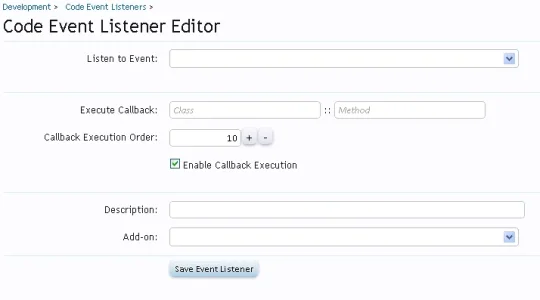
Lets fill all the information.
Listen to Event: Whenever you want to use the template hook system, you'll select in the "Listen to Event" the "template_hook". So, select "template_hook". This is the explanation you go it:
Execute Callback:: Do not fill this yet.
Callback Execution Order:: Leave the number in there. Do not change.
Enable Callback Execution: Make sure this is checked. So your Callback function will work.
Description: You can put whatever you want in here. Make sure you put something that you can undestand after. I will put "Listen to some template hooks".
Add-on: Select our add-on, the "newProfileTabs"
STOP! DONT HIT SAVE!
We need to fill the information with the Execute Callback. But we need to create our method before, right? Ok. I made this tutorial this way to make sure that the method we need to create will be understood by you.
In the page we are, we got the "Callback signature". Its located under the event description. See here:
That all is the parameters we need to use in our function. Write down in some place. We will use it in the next step.
Leave the page open. Do not close.
Step 6 - Our file Listener.php
Remember in the begining of this tutorial we discover the name of the template hook?
To help you:
template hook:member_view_tabs_heading
callback signature: $hookName, &$contents, array $hookParams, XenForo_Template_Abstract $template
Open your file "Listener.php" and add:
(you can ignore the comments)
Save.
Step 7 - Backing to the Code Event Listeners
Open back the page of the Code Events Listeners we created before. Remember you didnt hit the button "Save Event Listener", so the event listener is not working yet.
Now we have our method and class created we can fill the field "Execute Callback".
See:
Execute Callback: The first input is for the name of the class. Our class got the name "newProfileTabs_Listener". So put it on.
The second input is the name of the method that we will use for callback. We gave the name of "template_hook". So put it on.
Then, you will got something like this:

Click "Save Event Listener". Should be no errors. All right so far?
Step 8 - Omg! Its working!
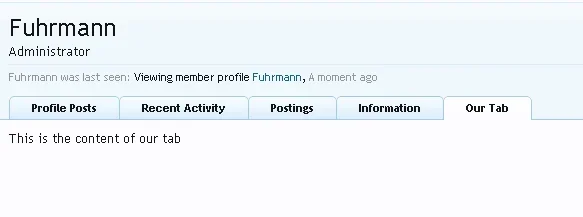
Go to some profile in your forum. See, our new tab is created!

Try to click!
...
Oh, nothing load, right? This is sad!
"But but i want my tab working!"
"want my money back"
Wait! There is more!
We have achieved our first goal: to create the tab. Now lets create the content.
Step 9 - Creating the content
Remember, there at the beginning of this tutorial we found the name of the template hook we want to use, right? Now we want some other template hook to put the content in!
The template is the same: member_view. You can re-open this template (if you alredy have closed).
Scroll to the bottom of the template (member_view) and you will find what we are looking for:
Saw? The hook:
Name: member_view_tabs_content
We will use this hook to insert the content of our tab in the profile page. Write down somewhere, we will use it.
Step 1 - First of all
You have to make sure that your XenForo is in debug mode. To do this, open your config.php (yourForum/library/config.php) and put this line into:
Code:
$config['debug'] = true;Save it. Close. Go to your AdminCP and you'll see a new tab. "Development".
Step 2 - The Add-on
Log into your AdminCP go to Development>Create Add-on
Lets fill the fields with this information:
Add-on ID: newProfileTabs
Title: New Profile Tabs in profile page
Version String: 1.0
Version ID: 1
Save it.
Step 3 - The template hook
This Add-on will use the template hooks system, so the new tabs always remained active even after an upgrade of XenForo.
First of all let's find the template of the profile page. There is so many ways to do that, here is what i do:
In my browser (Chrome), I go to the profile page and inspect it (F12) . I'm looking for some class that i can use to search in the "Search Template" AdminCP.
Let's see:

Appears that we can use the class "profilePage" for the search. Ok, go to your AdminCP>Appearence>Search Templates and search for.

Well, We got it! The template is "member_view".
If you look inside the template, you'll find:
Code:
<ul class="tabs mainTabs Tabs" data-panes="#ProfilePanes > li" data-history="on">
<li><a href="{$requestPaths.requestUri}#profilePosts">{xen:phrase profile_posts}</a></li>
<xen:if is="{$showRecentActivity}"><li><a href="{$requestPaths.requestUri}#recentActivity">{xen:phrase recent_activity}</a></li></xen:if>
<li><a href="{$requestPaths.requestUri}#postings">{xen:phrase postings}</a></li>
<li><a href="{$requestPaths.requestUri}#info">{xen:phrase information}</a></li>
<xen:if is="{$warningCount}"><li><a href="{$requestPaths.requestUri}#warnings">{xen:phrase warnings} ({xen:number $warningCount})</a></li></xen:if>
<xen:hook name="member_view_tabs_heading" params="{xen:array 'user={$user}'}" />
</ul>
That's what we were looking for! This code makes the current tabs, and there is the template hook. So far, we now the template name that make the tabs. Now we know too the name of the template hook! See this line:
Code:
<xen:hook name="member_view_tabs_heading" params="{xen:array 'user={$user}'}" />This is the hook name: "member_view_tabs_heading". Write down somewhere, we will use it.
Step 4 - Creating the files for the add-on
We need those files to make all works. Go to yourForum/library/
Our add-on structure will be like this:
yourForum
--library
----newProfileTabs
------Listener.php
Make sure you follow this structure, so this tutorial will work for you. Inside the folder "newProfileTabs" create a file called "Listener.php" and leave it there.
Step 5 - The Code Event Listeners
We can now create a new Code Event Listener and put this template hook into work. Let's see how.
Go to your AdminCP>Development>Code Event Listeners. Click in the button "+Create New Code Event Listener".
You'll see this:

Lets fill all the information.
Listen to Event: Whenever you want to use the template hook system, you'll select in the "Listen to Event" the "template_hook". So, select "template_hook". This is the explanation you go it:
Called whenever a template hook is encountered (via <xen:hook> tags). You may use this event to modify the final output of that portion of the template. A template hook may pass a block of final template output with it; you may either adjust this text (such as with regular expressions) or add additional output before or after the contents. Some blocks will not pass contents with them; they are primarily designed to allow you to add additional components in those positions.
Execute Callback:: Do not fill this yet.
Callback Execution Order:: Leave the number in there. Do not change.
Enable Callback Execution: Make sure this is checked. So your Callback function will work.
Description: You can put whatever you want in here. Make sure you put something that you can undestand after. I will put "Listen to some template hooks".
Add-on: Select our add-on, the "newProfileTabs"
STOP! DONT HIT SAVE!
We need to fill the information with the Execute Callback. But we need to create our method before, right? Ok. I made this tutorial this way to make sure that the method we need to create will be understood by you.
In the page we are, we got the "Callback signature". Its located under the event description. See here:
Code:
$hookName, &$contents, array $hookParams, XenForo_Template_Abstract $templateThat all is the parameters we need to use in our function. Write down in some place. We will use it in the next step.
Leave the page open. Do not close.
Step 6 - Our file Listener.php
Remember in the begining of this tutorial we discover the name of the template hook?
To help you:
template hook:member_view_tabs_heading
callback signature: $hookName, &$contents, array $hookParams, XenForo_Template_Abstract $template
Open your file "Listener.php" and add:
(you can ignore the comments)
PHP:
<?php
//Look! The name of the class follow our directory structure!
//nameOfTheAddon_File (without the ".php" for sure!)
//This can be: nameOfTheAddon_Folder_File or nameOfTheAddon_Folder_Folder_File
class newProfileTabs_Listener
{
    //Our callback signature! We are using here! Look:
    public static function template_hook ($hookName, &$contents, array $hookParams, XenForo_Template_Abstract $template)
    {
        //Yey! its our template hook!
        if ($hookName == 'member_view_tabs_heading')
        {
            //Our tab! We will do somethin better, hang on.
            $contents .= '<li><a href="{$requestPaths.requestUri}#ourTab">Our Tab</a></li>';
        }
    }
}
?>
Save.
Step 7 - Backing to the Code Event Listeners
Open back the page of the Code Events Listeners we created before. Remember you didnt hit the button "Save Event Listener", so the event listener is not working yet.
Now we have our method and class created we can fill the field "Execute Callback".
See:
Execute Callback: The first input is for the name of the class. Our class got the name "newProfileTabs_Listener". So put it on.
The second input is the name of the method that we will use for callback. We gave the name of "template_hook". So put it on.
Then, you will got something like this:

Click "Save Event Listener". Should be no errors. All right so far?
Step 8 - Omg! Its working!
Go to some profile in your forum. See, our new tab is created!

Try to click!
...
Oh, nothing load, right? This is sad!
"But but i want my tab working!"
"want my money back"
Wait! There is more!
We have achieved our first goal: to create the tab. Now lets create the content.
Step 9 - Creating the content
Remember, there at the beginning of this tutorial we found the name of the template hook we want to use, right? Now we want some other template hook to put the content in!
The template is the same: member_view. You can re-open this template (if you alredy have closed).
Scroll to the bottom of the template (member_view) and you will find what we are looking for:
Code:
<xen:if is="{$warningCount}">
<li id="warnings" class="profileContent" data-loadUrl="{xen:link members/warnings, $user}">
{xen:phrase loading}...
<noscript><a href="{xen:link members/warnings, $user}">{xen:phrase view}</a></noscript>
</li>
</xen:if>
<xen:hook name="member_view_tabs_content" params="{xen:array 'user={$user}'}" />
Saw? The hook:
Code:
<xen:hook name="member_view_tabs_content" params="{xen:array 'user={$user}'}" />Name: member_view_tabs_content
We will use this hook to insert the content of our tab in the profile page. Write down somewhere, we will use it.
